Blog

  • Is 2026 the Cheapest Year to Visit Japan? The Weak Yen Explained

    Is 2026 the Cheapest Year to Visit Japan? The Weak Yen Explained

    Affiliate Disclosure: This article contains affiliate links. If you click through and make a purchase, I may earn a small commission at no extra cost to you. I only recommend products and services I’ve personally used or thoroughly researched. Thank you for supporting this site!

    Introduction: Why Everyone’s Talking About Japan Being “Cheap” in 2026

    I’ve been living in Japan on and off for over a decade, and I’ve never seen anything quite like this. Friends back home who once considered Japan a “bucket list someday” destination are suddenly booking flights. Coworkers are extending business trips to squeeze in a week in Kyoto. Digital nomads are setting up camp in Osaka for months at a time. And the reason is simple: the Japanese yen is historically weak, and your dollars, euros, and pounds go ridiculously far right now.

    But is 2026 actually the cheapest year to visit Japan? Is the weak yen the whole story, or are there hidden costs that eat into your savings? And most importantly — how do you take full advantage of the situation whether you’re visiting for two weeks or planning a permanent move?

    I’m going to break all of this down for you, based on real experience living here, watching exchange rates daily, and helping hundreds of people plan their Japan adventures. Let’s dive in.

    The Weak Yen in 2026: What’s Actually Happening

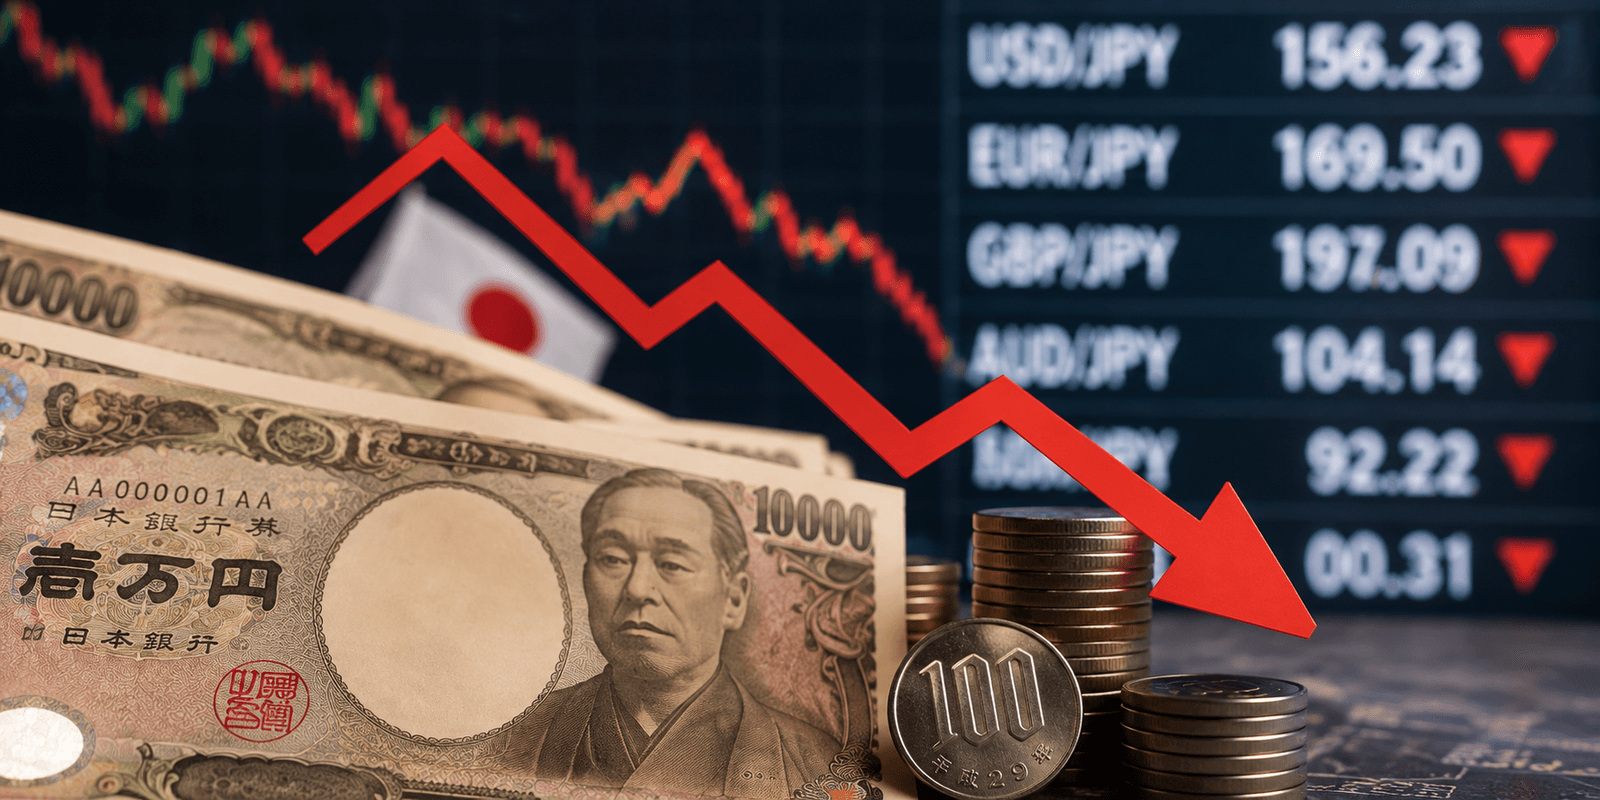
    Let’s start with the basics. The Japanese yen (JPY) has been trading at levels that would have been unthinkable a few years ago. Back in 2020, you’d get around 105-110 yen per US dollar. In 2026, we’re seeing rates hovering between 145-158 yen per dollar — and sometimes even higher.

    What does that mean in practical terms? Here’s a simple example:

    • A bowl of ramen that costs ¥900: In 2020, that was about $8.50. In 2026, it’s closer to $5.80-$6.20.
    • A night in a decent Tokyo hotel at ¥12,000: In 2020, that was $114. In 2026, it’s around $77-$83.
    • A Japan Rail Pass (7-day) at ¥50,000: In 2020, that was $476. In 2026, it’s approximately $322-$345.

    That’s a roughly 25-35% discount on virtually everything — just from the exchange rate alone. You’re not clipping coupons or hunting for deals. You’re simply benefiting from macroeconomic forces that happen to be in your favor.

    Why Is the Yen So Weak?

    Without turning this into an economics lecture, there are a few key factors:

    • Interest rate divergence: The Bank of Japan has maintained relatively low interest rates compared to the US Federal Reserve and other central banks. Money flows toward higher yields, weakening the yen.
    • Trade balance shifts: Japan imports a huge amount of energy, and elevated global energy prices have widened the trade deficit.
    • Structural economic changes: Japan’s aging population and slower GDP growth contribute to long-term yen softness.
    • Carry trade dynamics: Investors borrow in yen (cheap) and invest in higher-yielding currencies, pushing the yen down further.

    The Bank of Japan has signaled some policy normalization, but most analysts expect the yen to remain relatively weak through 2026. That said, currency markets are unpredictable — which is exactly why acting sooner rather than later makes sense.

    Is 2026 Actually the Cheapest Year? A Realistic Comparison

    Let’s be honest: calling any year “the cheapest ever” requires some nuance. Here’s how 2026 stacks up:

    Factor 2019 (Pre-COVID) 2023 2026
    USD/JPY Exchange Rate ~108 ~140-150 ~145-158
    Average Hotel Price (Tokyo, mid-range) ¥10,000-15,000 ¥12,000-18,000 ¥14,000-20,000
    Hotel Price in USD $93-139 $80-128 $89-138
    Flight Cost (LAX-NRT roundtrip) $600-900 $700-1,100 $550-950
    Tourism Crowds Moderate-High Rebounding Fast Very High
    Overall Value for USD Holders ★★★☆☆ ★★★★☆ ★★★★☆

    Here’s the nuanced truth: 2026 is one of the cheapest years in recent memory, but not necessarily cheaper than 2023-2024 across the board. The exchange rate remains highly favorable, but Japan’s domestic prices have crept up. Hotels, especially in tourist hotspots like Kyoto and Tokyo, have raised their rates. Some restaurants have increased prices by 10-20% due to inflation and ingredient costs. The tourism boom has also driven up demand-based pricing.

    That said, the weak yen more than compensates for these increases if you’re earning in a strong currency. Your overall trip cost in 2026 is still dramatically lower than it would have been in 2018 or 2019. And with more flight competition and route options, airfare to Japan is actually quite competitive right now.

    The verdict: 2026 is absolutely one of the best value years to visit Japan in the last two decades. Whether it’s THE cheapest depends on your specific spending patterns, but you won’t find many better windows.

    How to Maximize Your Money: Currency Exchange Tips

    The weak yen only works in your favor if you’re smart about how you convert your money. Here are my tried-and-tested recommendations:

    Use Wise (formerly TransferWise) for the Best Rates

    If there’s one thing I tell every single person coming to Japan, it’s this: do not exchange money at the airport. Those kiosks will eat 3-5% of your money in hidden markups.

    Instead, I’ve been using Wise for years. It gives you the real mid-market exchange rate with a tiny, transparent fee. You can hold yen in a multi-currency account, convert when the rate looks good, and spend with their debit card in Japan. I’ve saved hundreds of dollars over the years compared to traditional bank conversions.

    Carry Some Cash (Japan Still Loves It)

    Despite improvements in cashless payments, Japan is still more cash-heavy than you’d expect. Many smaller restaurants, temples, local shops, and even some mid-range hotels prefer cash. I recommend having ¥30,000-50,000 in cash on you at any given time, especially outside major cities.

    The best way to get cash? Withdraw from 7-Eleven ATMs using a card with no foreign transaction fees. Your Wise card works perfectly here.

    Lock In Rates When They’re Good

    Currency rates fluctuate daily. If you see the yen hit 155+ per dollar, that’s a great time to convert a chunk of money. Don’t try to time the absolute bottom — just convert when the rate is clearly favorable and you’ll come out ahead.

    Best Ways to Save Money in Japan in 2026

    The weak yen is your foundation, but there are plenty of ways to stack savings on top:

    1. Get a Japan Rail Pass (But Do the Math First)

    The JR Pass was restructured in late 2023 with higher prices, but with the weak yen, it’s still a solid deal for travelers covering long distances. A 7-day pass at ¥50,000 is about $325 at current rates — and a single Tokyo-Kyoto round trip on the Shinkansen costs about ¥27,000. If you’re doing more than one long-distance trip, the pass pays for itself.

    Pro tip: Regional passes (like the JR Kansai Pass or Hokkaido Pass) are often better value than the national pass if you’re staying in one area.

    2. Eat Like a Local

    You can eat incredibly well in Japan for ¥500-1,000 per meal ($3.25-$6.50). Conveyor belt sushi, gyudon chains like Yoshinoya and Matsuya, convenience store onigiri and bento boxes — these aren’t “budget” options, they’re genuinely delicious. Save the fancy omakase for one special night and eat affordably the rest of the time.

    3. Stay in Business Hotels or Hostels

    Japanese business hotels (Toyoko Inn, APA Hotel, Dormy Inn) are clean, efficient, and affordable — typically ¥6,000-10,000/night. Many include breakfast and onsen baths. At current exchange rates, you’re paying $40-65/night for a private room in central locations.

    4. Use IC Cards for Local Transport

    Suica or PASMO cards let you tap-and-go on trains, buses, and even convenience stores. They save time and often provide slight cost savings over buying individual tickets. You can now add them to Apple Wallet or Google Pay.

    5. Get a Local SIM Card or eSIM

    Don’t pay for international roaming — it’s a waste of money. A good Japan SIM card or eSIM costs a fraction of what your home carrier charges for roaming, and you’ll get reliable, fast data across the country.

    Essential Gear and Products for Your Japan Trip

    Beyond financial planning, here are products that’ll make your Japan experience smoother:

    A Reliable VPN

    If you want to access your home streaming services, check your bank without security flags, or just maintain privacy on Japan’s many public Wi-Fi networks, a VPN for Japan is essential. I use one daily — it’s a non-negotiable part of my tech setup here.

    A Good Travel Adapter

    Japan uses Type A plugs (the same as the US). If you’re coming from Europe, the UK, or Australia, you’ll need an adapter. I recommend getting a universal travel adapter that covers multiple countries.

    Browse universal travel adapters on Amazon →

    A Portable Wi-Fi Battery Pack

    You’ll be on your feet all day exploring, and your phone will be working overtime with maps, translations, and photos. A good 20,000mAh power bank is a lifesaver.

    Shop portable power banks on Amazon →

    Packing Cubes

    Japan involves a lot of moving between cities, and trains don’t have much luggage space. Packing cubes keep you organized and help you fit everything into a smaller bag — which you’ll appreciate on crowded Shinkansen cars.

    Find packing cubes on Amazon →

    A Japanese Phrasebook or Language App

    Even basic Japanese goes a long way. While many tourist areas have English signage, stepping off the beaten path (which I highly recommend) means you’ll encounter situations where a few phrases make all the difference. Check out our guide to the best language apps for Japanese to get started before your trip.

    Browse Japanese phrasebooks on Amazon →

    Pros and Cons of Visiting Japan in 2026

    Pros

    • Exceptional exchange rates — 25-35% more purchasing power for USD, EUR, GBP, and AUD holders
    • World-class infrastructure — trains run on time, everything is clean, and navigation is easy
    • Incredible food value — Michelin-quality meals at street-food prices by Western standards
    • More flight options — increased competition on Pacific routes means better airfares
    • Cashless improvements — more places accept credit cards and mobile payments than ever before
    • New attractions — expanded teamLab exhibits, new hotel openings, and infrastructure upgrades for Expo 2025 legacy projects

    Cons

    • Overtourism in hotspots — Kyoto’s Higashiyama district, Shibuya crossing, and Fushimi Inari are more crowded than ever
    • Rising domestic prices — Japanese inflation means local prices have increased, partially offsetting exchange rate gains
    • Hotel availability — book well in advance, especially during cherry blossom season (late March-April) and autumn foliage (November)
    • Summer heat — June through September is brutally hot and humid; consider shoulder seasons
    • Currency risk — the yen could strengthen unexpectedly, reducing your advantage

    Buying Guide: How to Plan a Budget Japan Trip in 2026

    Here’s a step-by-step framework for maximizing the weak yen:

    Step 1: Set Your Budget in Yen, Not Dollars

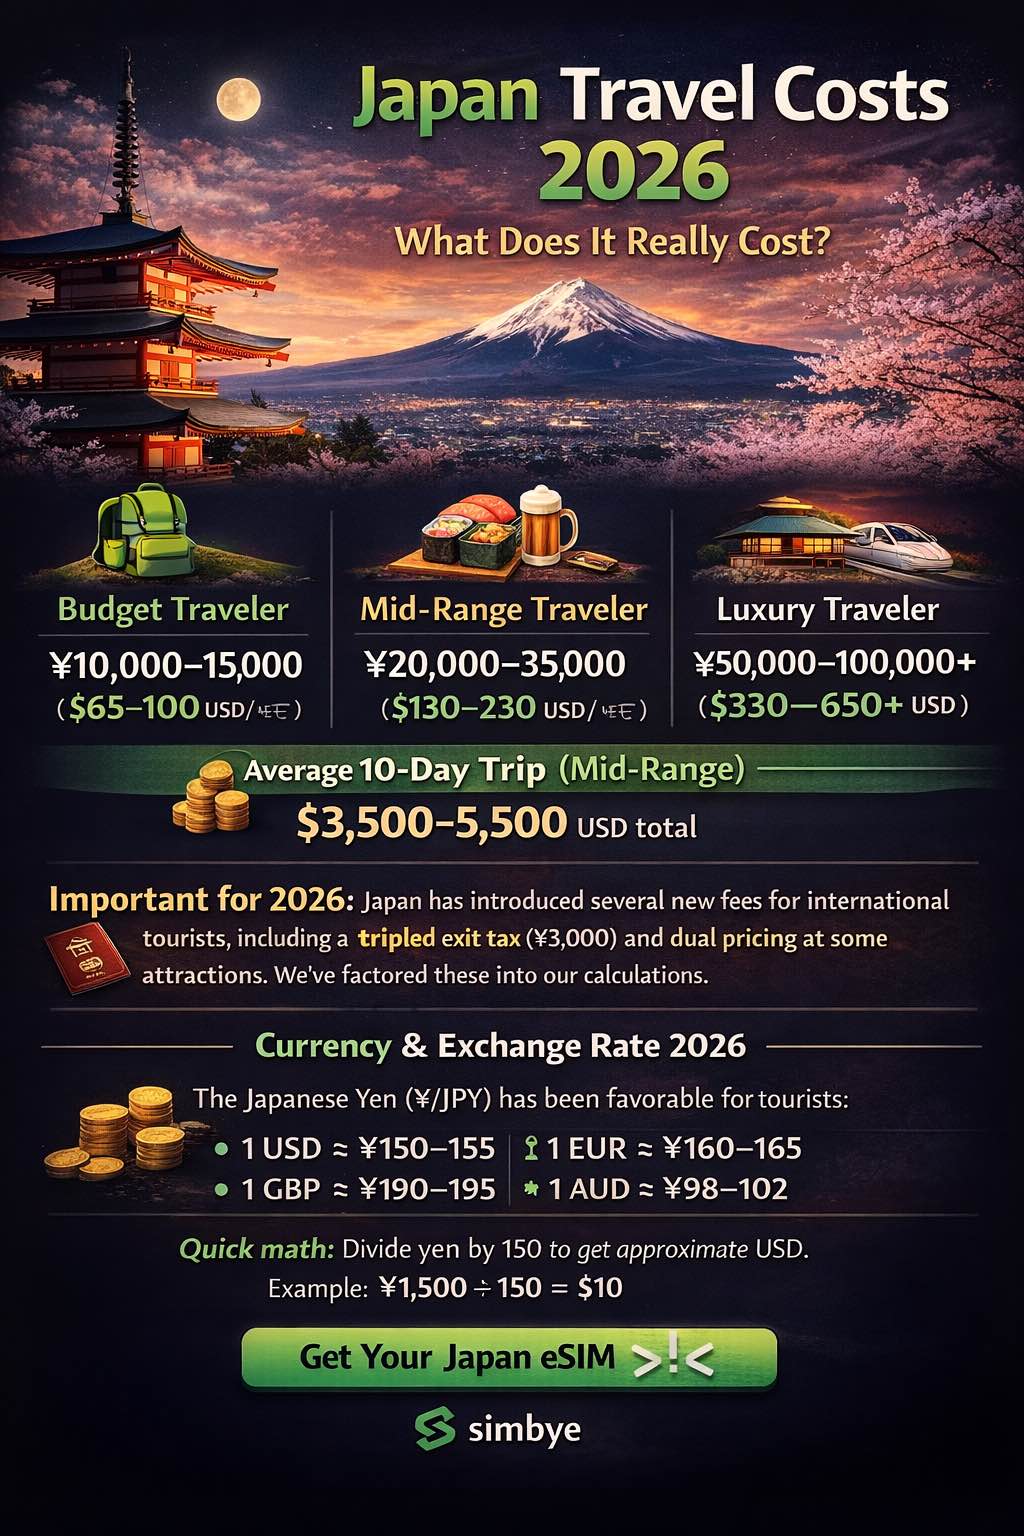
    This is a mindset shift that saves money. Figure out daily costs in yen first: ¥8,000-12,000 for budget travel, ¥15,000-25,000 for mid-range, ¥30,000+ for luxury. Then convert at current rates to see how affordable it really is.

    Step 2: Book Flights Early

    Airfare is the one cost that isn’t affected by the exchange rate. Set fare alerts on Google Flights or Skyscanner. The sweet spot for booking is typically 2-4 months before departure for international flights to Japan.

    Step 3: Open a Wise Account

    Do this weeks before your trip. Convert money when rates are favorable. You’ll have a multi-currency debit card ready to use the moment you land.

    Step 4: Book Accommodation Strategically

    Mix it up: business hotels in cities, ryokans for one special night, and hostels if you’re on a tight budget. Book directly through Japanese hotel websites when possible — they sometimes offer lower rates than international booking platforms, and the weak yen makes the yen-denominated price even more attractive.

    Step 5: Plan Your Rail Travel

    Map out your itinerary and calculate whether a JR Pass makes sense. Use Hyperdia or Google Maps to check individual ticket prices, then compare against pass costs.

    Step 6: Get Connected

    Order your SIM card or eSIM before you leave. Activate your VPN subscription. Download offline maps and a translation app. Being connected from the moment you land saves time, money, and stress.

    Step 7: Learn Basic Phrases

    Even “sumimasen” (excuse me), “arigatou gozaimasu” (thank you very much), and “eigo no menu wa arimasu ka?” (do you have an English menu?) will dramatically improve your interactions.

    Frequently Asked Questions

    Will the yen stay weak throughout 2026?

    Most financial analysts expect the yen to remain relatively weak through 2026, though gradual strengthening is possible if the Bank of Japan continues raising interest rates. Currency markets are inherently unpredictable, so the honest answer is: nobody knows for certain. If the current rates look good to you, it’s wise to convert some money now rather than gambling on future improvements. The rates in 2026 are still significantly better than what we saw from 2015-2020.

    Is Japan actually cheap now, or just cheaper than before?

    Both. Compared to other developed countries, Japan is now genuinely affordable — not just “cheaper than it used to be.” A quality lunch that costs ¥800 ($5.20) would easily be $15-20 in New York, London, or Sydney. A clean, comfortable hotel room for ¥8,000 ($52) would cost $150+ in most Western capitals. Japan offers first-world infrastructure and service at developing-country prices for foreign visitors right now. That’s a rare combination.

    Should I exchange all my money before I go to Japan?

    No. Convert some money in advance through Wise to lock in a good rate, but don’t convert everything at once. You’ll want flexibility to withdraw yen from ATMs as needed (7-Eleven ATMs are the most reliable for foreign cards) and pay by card where possible. Carrying too much cash is risky, and you might end up with excess yen to convert back at a loss. I typically recommend having ¥30,000-50,000 in cash when you arrive, then using your card for larger purchases.

    What’s the best time of year to visit Japan in 2026?

    For the best combination of weather, prices, and crowds, I recommend: mid-January to February (cold but uncrowded and cheapest hotels), late May to mid-June (beautiful weather before rainy season hits hard), or late October to mid-November (stunning autumn colors, pleasant temperatures). Cherry blossom season (late March-April) is magical but crowded and expensive. Summer (July-August) is sweltering. Choose based on your priorities.

    Is it worth moving to Japan to take advantage of the weak yen?

    This is a question I get constantly, and the answer depends on your income source. If you earn in USD/EUR/GBP remotely, living in Japan right now is an incredible deal — your rent, food, and daily expenses are effectively 25-35% cheaper than they’d be at “normal” exchange rates. However, if you’re planning to earn a local Japanese salary, the weak yen actually hurts you (your savings are worth less internationally). For a full breakdown of what it takes, check out our moving to Japan checklist.

    Conclusion: Don’t Wait — 2026 Is Your Window

    After living in Japan for over a decade, I can tell you that the current situation is genuinely unprecedented. The combination of a historically weak yen, improved tourism infrastructure, competitive airfares, and Japan’s eternally excellent food, culture, and hospitality makes 2026 one of the best years in recent memory to visit or move here.

    Is it the absolute cheapest year ever? In pure exchange rate terms, the 2023-2026 window has been the most favorable for foreign visitors in decades. Domestic prices have risen, but the exchange rate advantage more than compensates. Whether you’re planning a two-week vacation or a permanent relocation, the math works strongly in your favor right now.

    But here’s the thing about windows: they close. The Bank of Japan is slowly normalizing policy. Global economic conditions shift. The yen won’t stay this weak forever — and when it strengthens, the incredible value you’re getting today becomes a memory.

    My advice? Start planning now. Set up your Wise account, book those flights, grab a SIM card, and get ready for the trip of a lifetime at prices you might never see again. Japan is waiting, and right now, it’s practically rolling out the red carpet for your wallet.

    Have questions about planning your Japan trip or move? Drop them in the comments below — I read and respond to every one.
  • Japan Trip Budget from Australia: Yen, Cards and Cash in 2026

    Japan Trip Budget from Australia: Yen, Cards and Cash in 2026

    Affiliate Disclosure: This article contains affiliate links. If you click through and make a purchase or sign up for a service, I may earn a small commission at no extra cost to you. This helps keep this site running so I can continue sharing practical Japan advice. I only recommend products and services I’ve personally used or thoroughly researched.

    Introduction: What Aussies Actually Need to Know About Money in Japan

    Look, I’ve been living in Japan for over a decade, and I’ve lost count of the number of Australian mates who’ve visited me and either got absolutely rinsed on exchange rates at the airport or showed up with nothing but a Visa card thinking they could tap-and-go everywhere like they do at Woolies.

    Japan in 2026 is a fascinating mix of cutting-edge technology and surprisingly old-school cash culture. While things have improved massively since the pandemic — contactless payments are way more common now — you’ll still find yourself standing at a ramen counter in Shinjuku at 11pm needing physical yen to pay for the best bowl of your life.

    The Australian dollar has been sitting in a fairly interesting position against the yen throughout 2026. As I write this, the exchange rate is hovering in a range that makes Japan genuinely affordable for Aussies compared to a few years back. But the rate you actually get depends entirely on how you choose to access your money — and that’s where most people leave hundreds of dollars on the table.

    This guide covers everything: realistic daily budgets, the best cards to bring, how much cash you need, where to exchange, and the money mistakes I watch Australians make over and over again. Whether you’re planning a 10-day holiday or you’re thinking about moving to Japan long-term, getting your money strategy right is genuinely one of the most important things you can do before you fly.

    Realistic Daily Budgets for Australians in Japan (2026)

    Before we get into the how, let’s talk about the how much. Here’s what you should realistically budget per person per day in 2026, converted to AUD at current rates:

    Budget Traveller: AUD $100–$140/day

    • Accommodation: Hostels, capsule hotels, or budget business hotels ($40–$60)
    • Food: Convenience store breakfasts, ramen/gyudon lunches, mid-range dinners ($30–$45)
    • Transport: Japan Rail Pass or local trains ($15–$25)
    • Activities & Extras: Temple entries, one attraction ($15–$20)

    Mid-Range Traveller: AUD $200–$300/day

    • Accommodation: 3-star hotels, ryokans on occasion ($80–$140)
    • Food: Mix of casual and sit-down restaurants, the odd izakaya night ($50–$80)
    • Transport: JR Pass plus local transit, occasional taxi ($25–$40)
    • Activities & Extras: Multiple attractions, day trips, some shopping ($40–$60)

    Comfort/Luxury Traveller: AUD $400–$600+/day

    • Accommodation: 4-5 star hotels, premium ryokans ($180–$300+)
    • Food: High-end sushi, kaiseki, Michelin spots ($100–$150)
    • Transport: Green car JR Pass, taxis, private transfers ($40–$70)
    • Activities & Extras: Private tours, premium experiences ($80–$120)

    For a typical 10-day trip, most Aussie couples I know spend between $5,000 and $8,000 total (for two people), including flights. Solo travellers can do it for $2,500–$4,500 comfortably at mid-range. These numbers are real — I’ve helped dozens of friends plan trips in the last couple of years.

    Wise Multi-Currency Account: The Must-Have for Aussie Travellers

    If you only do one thing before your trip, get a Wise account (formerly TransferWise). I’m not being dramatic — this single move will save you more money than any other tip in this article.

    Why Wise is essential for Australia-to-Japan trips:

    Pros:

    • Uses the real mid-market exchange rate (the one you see on Google) with a tiny transparent fee
    • Hold and convert AUD to JPY whenever the rate looks good — even weeks before your trip
    • The Wise debit card works at Japanese ATMs (7-Eleven and Japan Post ATMs are the most reliable)
    • Contactless payments work at major retailers, convenience stores, and many restaurants
    • Free ATM withdrawals up to a monthly limit (currently around AUD $350/month)
    • App shows you exactly what you’re being charged in real-time

    Cons:

    • ATM free withdrawal limit means you might pay small fees if you withdraw lots of cash
    • Not accepted at every single merchant (but neither is any card in Japan)
    • You need to plan ahead — order the card at least 2 weeks before departure

    I’ve been using Wise for years and it consistently beats every Australian bank for exchange rates. The difference between Wise’s rate and what you’d get at a Travelex counter at Sydney Airport can easily be 4-6%. On a $3,000 trip budget, that’s $120–$180 you’re throwing away. Get the full breakdown in my detailed Wise review for Japan.

    Best Australian Travel Cards for Japan in 2026

    Wise is my top pick, but it shouldn’t be your only option. Japan rewards the prepared, and having backups is crucial. Here are the best cards to consider:

    1. Wise Multi-Currency Card (Top Pick)

    As detailed above — best exchange rates, most transparent fees, excellent app. This is your primary spending and withdrawal card.

    2. Revolut

    Revolut has gotten much better for Australians in 2026. The standard free plan gives you fee-free currency exchange up to a monthly limit, and the card works well in Japan. It’s a solid backup to Wise, and some months Revolut’s rate edges slightly ahead.

    Pros: Good rates, decent free tier, virtual cards for online purchases

    Cons: Weekend exchange rate markup, customer service can be slow

    3. ING Orange Everyday

    If you want to keep things with an Aussie bank, ING’s Orange Everyday account has no international transaction fees on card purchases and no ATM fees if you meet their monthly deposit conditions. The exchange rate isn’t as good as Wise, but it’s significantly better than the Big Four banks.

    Pros: No foreign transaction fees, familiar Aussie banking, Visa network

    Cons: Exchange rate includes a small margin, need to meet eligibility criteria each month

    4. Up Bank

    Up uses Wise’s exchange rates for international transactions, which is brilliant. If you’re already an Up customer, your existing card is actually a solid Japan travel card without doing anything extra.

    Pros: Wise-powered exchange rates, no foreign transaction fees, great app

    Cons: ATM withdrawal fees may apply internationally

    5. Your Existing Credit Card (Emergency Backup)

    Bring a Visa or Mastercard credit card as an emergency backup, but be aware that most Australian credit cards charge 2-3% foreign transaction fees. Amex has limited acceptance in Japan. Keep this in your hotel safe and only use it if your other options fail.

    Cash in Japan: How Much to Bring and Where to Get It

    Here’s the truth that surprises most Australians: you still need cash in Japan in 2026. Yes, cashless payments have expanded enormously — most convenience stores, chain restaurants, and department stores accept cards and IC cards. But you’ll hit cash-only situations regularly:

    • Small ramen shops, izakayas, and local restaurants
    • Temple and shrine admission fees
    • Street food vendors and market stalls
    • Some taxis (though this is improving)
    • Coin lockers at train stations
    • Vending machines (many now accept IC cards, but not all)
    • Small ryokans and guesthouses

    How Much Cash to Carry

    I recommend having ¥30,000–¥50,000 (roughly AUD $300–$500) in cash on you at any time. Japan is incredibly safe — you genuinely don’t need to worry about carrying cash the way you might in other countries. I’ve walked around Tokyo with ¥100,000 in my wallet without a second thought.

    Best Way to Get Yen

    Option 1 (Recommended): Withdraw from 7-Eleven ATMs in Japan using your Wise card. These ATMs are everywhere (there are over 21,000 7-Elevens in Japan), they have English menus, and they accept international cards reliably. Japan Post ATMs are another excellent option.

    Option 2: Exchange a small amount of AUD to JPY before you leave. Having ¥10,000–¥20,000 in your pocket when you land is smart for the train to your hotel and any immediate expenses. Use a competitive service — avoid airport exchange counters where rates are brutal.

    Option 3: Use your Wise app to convert AUD to JPY when the rate is good. You can lock in a rate weeks before your trip. This is genuinely powerful — I’ve saved meaningful amounts by converting on a good rate day rather than whatever the rate is when I’m standing at an ATM.

    Where NOT to Exchange Money

    • Sydney/Melbourne Airport Travelex: Rates are consistently 5-8% worse than mid-market. Just don’t.
    • Narita/Haneda Airport exchange counters: Better than Australian airports but still marked up
    • Your Australian bank: The Big Four charge terrible exchange rates plus fees. Commonwealth, ANZ, Westpac, NAB — they all take 3-5% in hidden margin
    • Hotel front desks: Convenience rates, which means bad rates

    IC Cards: Your Secret Weapon for Daily Spending

    Get a Suica or Pasmo IC card (or the mobile versions on your phone) as soon as you arrive. These rechargeable transit cards work on virtually all trains and buses across Japan, and they’re also accepted at convenience stores, vending machines, coin lockers, and many shops.

    In 2026, you can set up a mobile Suica directly on your iPhone (Wallet app) or Android phone (Google Pay) without even visiting a ticket counter. Load it up with yen from your Wise card or at a station fare machine with cash, and you’ll be tapping through ticket gates like a local within minutes.

    Pro tip: I keep about ¥5,000 on my Suica at all times. It’s not just for transport — when that tiny yakitori place doesn’t take cards but does take IC cards, you’ll be grateful.

    Essential Travel Accessories for Managing Money in Japan

    A few physical items that make money management in Japan much smoother:

    A coin purse or coin wallet: Japan uses ¥1, ¥5, ¥10, ¥50, ¥100, and ¥500 coins. You will accumulate coins rapidly, and the ¥500 coin is worth about $5 AUD — that’s real money. Get a small coin purse. Check out Japanese-style coin purses on Amazon.

    A slim RFID-blocking wallet: You’ll be carrying multiple cards (Wise, backup credit card, IC card). A slim travel wallet keeps everything organized and secure. Browse RFID-blocking travel wallets here.

    A money belt or hidden pouch: Honestly, Japan is so safe you probably won’t need it, but for peace of mind during long travel days — especially in crowded trains — it’s worth having. Find travel money belts on Amazon.

    Staying Connected: You Need Data to Manage Your Money

    Everything I’ve recommended — Wise app, mobile Suica, Google Maps for finding ATMs, real-time exchange rate checking — requires reliable mobile data. Don’t rely on hotel Wi-Fi for your financial apps.

    Grab a solid data-only SIM or eSIM before you leave Australia. I’ve written a full guide on the best SIM cards for Japan that covers all the current options for 2026, including eSIMs that you activate instantly on your phone.

    Buying Guide: Setting Up Your Japan Money Strategy Step by Step

    Here’s exactly what I tell my Australian mates to do, in order:

    4-6 Weeks Before Your Trip

    1. Sign up for Wise and order the physical debit card. Verify your identity (Australian passport or driver’s licence works).
    2. Download Revolut or confirm your ING/Up Bank card is ready as a backup.
    3. Start watching the AUD/JPY exchange rate. Set up rate alerts in the Wise app. When you see a good rate, convert some AUD to JPY.
    4. Calculate your rough trip budget using the daily figures above. Add 15-20% buffer for unexpected splurges (you will buy things in Japan you didn’t plan on buying).

    1-2 Weeks Before

    1. Convert the bulk of your trip budget to JPY in your Wise account. You don’t have to convert it all — but having 60-70% pre-converted means you’re not at the mercy of whatever the rate is during your trip.
    2. Notify your backup bank that you’re travelling to Japan. Some Australian banks still block international transactions if they don’t know you’re travelling.
    3. Order a small amount of physical yen from a competitive currency exchange if you want cash on arrival. ¥20,000 is plenty for the first day.

    On Arrival in Japan

    1. Set up mobile Suica on your phone (or buy a physical card at the airport train station).
    2. Withdraw ¥30,000–¥50,000 from a 7-Eleven ATM using your Wise card.
    3. Keep your cash, cards, and coins organized. Wallet for notes and primary cards, coin purse for coins, phone for Suica and Wise app.

    During Your Trip

    1. Use card payments wherever accepted — Wise card first, backup card if needed.
    2. Use Suica for transit and small convenience store purchases.
    3. Use cash for small restaurants, shrines, markets, and anywhere that doesn’t take cards.
    4. Top up cash every few days rather than carrying huge amounts (though again, Japan is incredibly safe).
    5. Check the Wise app daily to track your spending. It’s much better than trying to reconstruct your budget from memory.

    Common Money Mistakes Australians Make in Japan

    After a decade of watching friends and fellow Aussies visit, these are the recurring mistakes:

    • Exchanging all their money at Sydney Airport: Literally the worst exchange rate you’ll find anywhere in the process. I’ve seen people lose $200+ on a $3,000 exchange.
    • Only bringing cards, no cash: You will get caught out. That incredible hole-in-the-wall tonkatsu place, that beautiful ceramic at a craft market — cash only.
    • Using their Commbank/ANZ card for everything: 3% foreign transaction fee + poor exchange rate = bleeding money on every single transaction.
    • Not having a coin strategy: Japanese coins accumulate fast. Use them! Pay with exact change when you can. ¥500 coins are basically gold coins — don’t let them pile up unused.
    • Forgetting to budget for the JR Pass separately: The Japan Rail Pass is a major expense ($300-$600 AUD depending on duration). Account for it in your pre-trip budget, not your daily spending money.
    • Over-tipping: There is no tipping culture in Japan. Seriously, don’t do it. It can cause confusion or even offense. This saves you 15-20% compared to Australian dining costs right off the bat.

    FAQ: Japan Trip Budget from Australia

    How much spending money should I bring to Japan from Australia for 2 weeks?

    For a mid-range two-week trip, budget approximately AUD $3,500–$5,000 per person for all in-country expenses (accommodation, food, transport, activities). This doesn’t include flights or the JR Pass. Budget travellers can manage on $2,000–$2,800, while luxury travellers should plan for $7,000+. Pre-convert at least 60% into JPY using Wise before departure for the best rates.

    Can I use my Australian debit card in Japan?

    Technically yes, but you’ll be hit with foreign transaction fees (typically 2-3%) and a poor exchange rate from the Big Four banks. A Wise or Revolut card will save you significant money. If you must use an Aussie bank card, ING Orange Everyday and Up Bank are the best options as they charge no foreign transaction fees. Always choose to be charged in JPY (not AUD) at ATMs and payment terminals to avoid dynamic currency conversion markups.

    Is Japan expensive for Australians in 2026?

    Japan is currently excellent value for Australians. The yen has been relatively weak compared to historical averages, making everything from accommodation to dining noticeably cheaper than a few years ago. A quality restaurant meal that might cost $40-50 AUD in Sydney can be had for $15-25 AUD in Japan. Accommodation is generally cheaper than equivalent Australian hotels, and public transport — while extensive — is very reasonably priced, especially with a JR Pass.

    Should I exchange money before leaving Australia or in Japan?

    Neither is the best option, actually. The smartest approach is to convert AUD to JPY digitally using Wise when the exchange rate is favorable (potentially weeks before your trip), then withdraw yen from 7-Eleven ATMs in Japan using your Wise debit card. If you want physical yen before departure for peace of mind, exchange a small amount (¥10,000-20,000) through a competitive online currency service — never at the airport.

    Do I need to carry cash in Japan in 2026?

    Yes, absolutely. While Japan’s cashless infrastructure has improved dramatically, cash is still essential. Many small restaurants, street food vendors, local attractions, traditional ryokans, and market stalls remain cash-only. I recommend carrying ¥30,000–¥50,000 at any time. Japan is one of the safest countries in the world for carrying cash — lost wallets are routinely turned in to police boxes with all the money still inside.

    Conclusion: Your Japan Money Strategy in a Nutshell

    After helping countless Australians prepare for Japan trips and living here myself for over a decade, I can boil the money strategy down to this:

    1. Get Wise. Sign up, get the card, convert your AUD to JPY when the rate looks good. This is the single biggest money-saving move you can make.
    2. Bring a backup card. Revolut, ING, or Up Bank. Never rely on a single card overseas.
    3. Carry cash. Withdraw from 7-Eleven ATMs using Wise. Keep ¥30,000–¥50,000 on you. Get a coin purse.
    4. Set up mobile Suica. Use it for trains and everyday small purchases.
    5. Budget realistically. $150-250 AUD per person per day covers most travellers comfortably. Add 15-20% buffer because Japan has an uncanny ability to make you want to buy things you never knew existed.

    Japan is genuinely one of the best-value destinations for Australians right now in 2026. The food is extraordinary, the transport is immaculate, the culture is endlessly fascinating, and your Aussie dollar goes further than it has in years. Just don’t waste that advantage by using poor exchange methods.

    Get your money sorted, plan your trip properly, and you’ll be sitting in a steaming onsen in Hakone wondering why you didn’t do this years ago.

    Safe travels, and feel free to drop me a message if you have any questions about money in Japan. I’ve made all the expensive mistakes so you don’t have to.

  • Best Health Insurance for Digital Nomads in Japan (2026 Guide)

    Best Health Insurance for Digital Nomads in Japan (2026 Guide)

    Affiliate Disclosure: This article contains affiliate links. If you purchase through these links, I may earn a small commission at no extra cost to you. I only recommend products and services I’ve personally used or thoroughly researched. Your support helps keep this site running — thank you!

    Introduction: Why Health Insurance in Japan Is Non-Negotiable for Digital Nomads

    Let me be real with you: Japan is one of the best places on Earth to be a digital nomad. The trains run on time, the coffee shops have power outlets, the internet is blazing fast, and the food will ruin every other country’s food for you forever. But here’s the thing that catches a lot of people off guard — health insurance in Japan is complicated, especially when you don’t fit neatly into the “employee” or “student” box.

    I’ve been living in Japan for over a decade, and I’ve watched countless digital nomads arrive with zero insurance, a tourist visa, and a vague plan. Some get lucky. Others end up in an emergency room staring at a bill that would make their eyes water, even in a country with relatively affordable healthcare.

    Here’s what you need to understand: Japan’s healthcare system is incredible, but it’s designed for residents. If you’re on a tourist visa or a short-term stay, you’re technically not enrolled in the National Health Insurance (NHI) system. And even if you have a residence card and are enrolled, NHI might not be your best or only option.

    In 2026, the digital nomad landscape in Japan is evolving fast. Japan introduced its Digital Nomad Visa (officially the “Designated Activities Visa for Digital Nomads”) which allows stays of up to six months. But this visa type doesn’t automatically enroll you in NHI, which means you need private coverage. Whether you’re on that visa, bouncing through on tourist visa runs (please stop doing this), or actually properly settled with a residence status, this guide will break down your best health insurance options.

    I’ve compared international nomad insurance, Japan-specific expat plans, and the national system side by side so you can figure out exactly what fits your situation and budget. Let’s dive in.

    Quick Comparison: Top Health Insurance Options for Digital Nomads in Japan (2026)

    Insurance Provider Best For Monthly Cost (Approx.) Japan Coverage Visa Requirement
    SafetyWing Nomad Insurance Budget-conscious nomads, short stays $45–$85 USD Yes (as foreign country) None
    World Nomads Adventure travelers, short-term stays $70–$150 USD Yes None
    Cigna Global Long-term expats wanting comprehensive coverage $150–$400 USD Yes None (but designed for residents)
    Allianz Care International Expats needing flexible global coverage $200–$450 USD Yes None
    Japan NHI (国民健康保険) Residents with valid visa (3+ months) ¥15,000–¥80,000+ JPY Full domestic coverage Residence card required
    Genki Explorer EU/international nomads, flexible plans €35–€90 EUR Yes None

    SafetyWing Nomad Insurance — The Digital Nomad Default

    If you’ve spent more than five minutes in digital nomad communities, you’ve heard of SafetyWing. There’s a reason it’s everywhere — it’s genuinely designed for people who work remotely while traveling, and it works on a subscription model that feels more like Netflix than traditional insurance.

    SafetyWing covers you in Japan as a “foreign country” (assuming Japan isn’t your home country), and you can sign up even after you’ve already arrived. That flexibility is huge. I’ve had friends sign up literally sitting in a Starbucks in Shibuya after realizing they’d been uninsured for two weeks.

    The coverage includes inpatient and outpatient care, emergency medical evacuation, and even some COVID-related treatment. In Japan, this means if you break your arm skiing in Niseko or get hospitalized for pneumonia in Osaka, you’re covered. The deductible is $250 per policy period, which is reasonable.

    What it doesn’t cover well: Routine checkups, dental, vision, and pre-existing conditions. If you need a regular prescription filled or want an annual physical, you’re paying out of pocket. Also, the maximum coverage per incident is capped, which could be a concern for major surgeries.

    Pros

    • Affordable — starts around $45/month for people under 40
    • No commitment — cancel anytime, subscription-based
    • Can sign up from anywhere, even mid-trip
    • Covers 180+ countries including Japan
    • Includes some trip interruption coverage

    Cons

    • $250 deductible per policy period
    • No dental or vision coverage
    • Coverage caps may be low for serious conditions in Japan
    • Pre-existing conditions not covered
    • Claims process can be slow (though improving in 2026)

    World Nomads — Best for Short-Term Adventurous Stays

    World Nomads has been around forever in the travel insurance space, and it’s a solid pick if you’re planning a shorter stint in Japan — say, one to three months. What sets it apart is its adventure activity coverage. Planning to hike Mt. Fuji, go scuba diving in Okinawa, or try snowboarding in Hokkaido? World Nomads actually covers injuries from these activities, which many plans exclude.

    The downside? It’s more expensive than SafetyWing, and it’s structured as a traditional travel insurance policy rather than a rolling subscription. You buy a set period of coverage, and extending can get pricey. It’s also not ideal if you’re planning to stay in Japan long-term.

    I used World Nomads years ago during my first extended trip to Japan before I had residency. It worked fine for a clinic visit in Tokyo when I had a nasty stomach bug — I paid upfront (about ¥8,000), submitted the receipt, and got reimbursed within three weeks.

    Pros

    • Excellent adventure activity coverage
    • Well-known and trusted brand
    • Can buy and extend while already abroad
    • 24/7 emergency assistance

    Cons

    • More expensive than competitors
    • Not subscription-based — less flexible for long-term nomads
    • Reimbursement-based (you pay first, claim later)
    • Limited coverage for routine or ongoing care

    Cigna Global — Comprehensive Coverage for Serious Expats

    If you’re moving beyond the “digital nomad passing through” phase and settling into Japan more seriously — maybe you’ve got a one-year visa, you’re renting an apartment, and you’re building a life here — Cigna Global is worth the investment. This is proper international health insurance, not travel insurance dressed up in a nomad costume.

    Cigna Global plans cover inpatient, outpatient, mental health, maternity, dental, and vision depending on your plan tier. Their network in Japan is solid, and many hospitals in Tokyo and Osaka accept direct billing with Cigna, meaning you don’t have to pay out of pocket and file claims later.

    The cost reflects this comprehensive coverage — expect to pay $150–$400+ per month depending on your age, plan level, and whether you include outpatient care. But if you value peace of mind and want coverage that rivals what you’d have in your home country, this is the gold standard.

    Pros

    • Truly comprehensive coverage including mental health and maternity
    • Direct billing at many Japanese hospitals
    • Customizable plans — add or remove modules
    • Excellent for long-term residents
    • Strong customer service with multilingual support

    Cons

    • Significantly more expensive than nomad-focused plans
    • Annual commitment usually required
    • Overkill for short stays under 3 months
    • Premiums increase with age

    Genki Explorer by Dr. Walter — The European Nomad Favorite

    Genki Explorer is hugely popular among European digital nomads, and for good reason. It’s affordable, flexible, and designed specifically for location-independent workers. Starting at around €35/month, it covers you worldwide including Japan, and the sign-up process is refreshingly simple.

    What I like about Genki is that they offer add-on modules. You can bolt on dental, luggage coverage, or liability insurance depending on your needs. The base plan covers hospital stays, outpatient treatment, emergency dental, prescriptions, and medical evacuation. For Japan specifically, their coverage works well for standard clinic visits and hospital care.

    One important note: Genki operates on a reimbursement model in Japan. You pay at the clinic or hospital, keep your receipts, and submit a claim. In my experience and from reports from other nomads in Japan, reimbursement takes about 2–4 weeks.

    Pros

    • Very affordable base plan
    • Modular — customize your coverage
    • Monthly subscription, cancel anytime
    • Good for both short and medium-term stays

    Cons

    • Reimbursement-based — you pay first
    • Less well-known in the US market
    • Customer service primarily in English and German
    • No direct billing network in Japan

    Japan’s National Health Insurance (NHI) — The Local Option

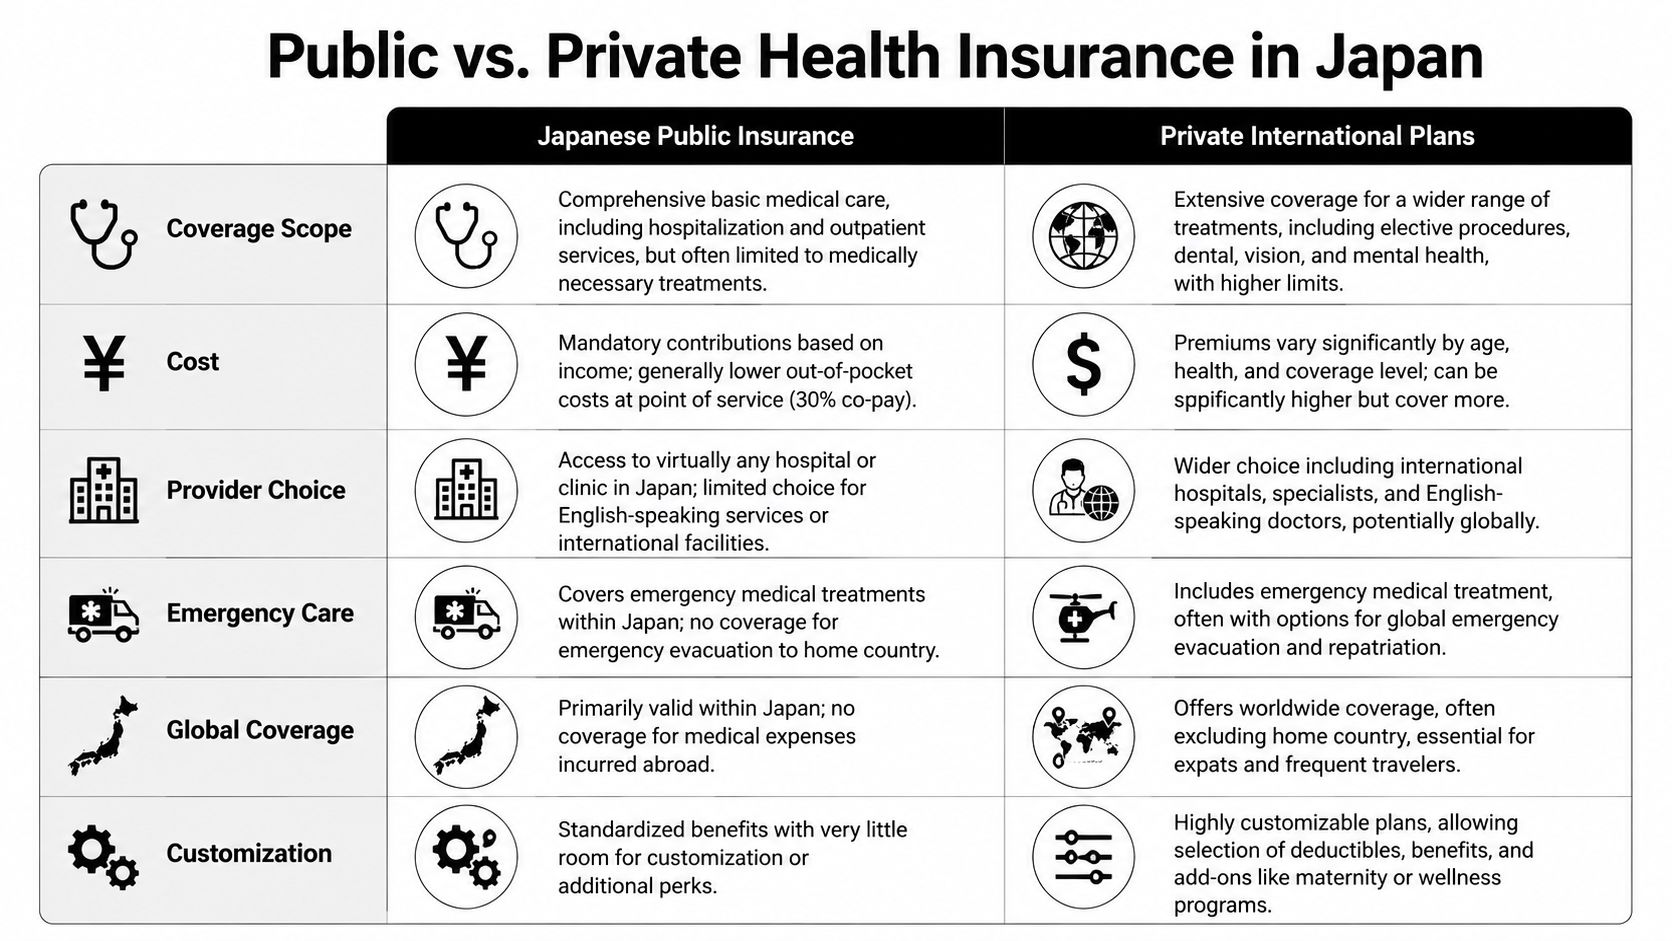
    Let’s talk about the elephant in the room. Japan’s National Health Insurance system (国民健康保険, or Kokumin Kenko Hoken) is one of the best healthcare systems in the world. It covers 70% of all medical costs — meaning you only pay 30% out of pocket for everything from doctor visits to major surgery. And Japanese healthcare prices are already regulated and affordable by Western standards.

    But here’s the catch for digital nomads: you need a valid residence card to enroll. If you’re on the Digital Nomad Visa (which is classified as Designated Activities), the rules around NHI enrollment can be murky. As of 2026, many municipalities are not enrolling Digital Nomad Visa holders in NHI because the visa duration is six months or less and the expectation is that you carry private insurance.

    However, if you have a longer-term visa — Spouse Visa, Working Visa, Highly Skilled Professional Visa, or even a one-year Student Visa — enrollment in NHI is mandatory if your employer doesn’t provide Shakai Hoken (Employee Health Insurance). And honestly, you should be grateful for it. I had a minor surgery last year that cost me about ¥25,000 out of pocket. The same procedure in the US would have been thousands of dollars.

    Your NHI premiums are calculated based on your previous year’s income. If you just arrived and had no Japanese income, your first year’s premiums will be very low — sometimes as little as ¥15,000–¥20,000 per month. But once your Japan-reported income kicks in, expect that number to climb.

    If you’re planning to move to Japan long-term, understanding NHI is essential. It’s not optional — it’s the law for residents.

    Pros

    • Covers 70% of ALL medical costs
    • Extremely affordable prescriptions
    • Accepted at virtually every clinic and hospital in Japan
    • No exclusions for pre-existing conditions
    • Includes dental (basic) and mental health

    Cons

    • Requires a residence card and valid mid-to-long-term visa
    • Premiums based on income — can get expensive for high earners
    • Only covers treatment within Japan
    • Not available to Digital Nomad Visa holders in most cases
    • Paperwork is in Japanese (bring a friend or use Google Translate)

    How to Choose the Right Health Insurance: A Practical Buying Guide

    Step 1: Determine Your Visa Status

    This is the single biggest factor. If you’re on a tourist visa or Digital Nomad Visa, NHI is likely not available to you, and you need private international insurance. If you hold a residence-based visa, NHI enrollment is mandatory (and awesome).

    Step 2: Assess Your Length of Stay

    Staying under 3 months? SafetyWing or World Nomads will serve you well. Staying 3–6 months on the Digital Nomad Visa? SafetyWing or Genki Explorer provide the best value. Planning to stay 6+ months or permanently? Look at Cigna Global as a supplement or rely on NHI if you’re eligible.

    Step 3: Consider Your Health Needs

    Are you generally healthy and just need catastrophic coverage? Go with a budget option like SafetyWing. Do you have ongoing health needs, take regular medication, or want comprehensive mental health support? Invest in Cigna Global or ensure you’re enrolled in NHI.

    Step 4: Budget Realistically

    I know, nobody loves paying for insurance. But medical costs, even in affordable Japan, can add up fast. A multi-day hospital stay can easily cost ¥500,000+ without insurance. An ambulance ride is free in Japan (yes, really), but the treatment afterward isn’t. Budget at minimum $45–$85/month for basic coverage.

    Step 5: Understand How Claims Work in Japan

    Most Japanese clinics and hospitals will not directly bill international insurance companies. You’ll typically pay out of pocket and submit a claim for reimbursement. Keep every receipt, ask for an itemized statement (診療明細書, shinryo meisaisho), and take photos of everything. Some larger hospitals in Tokyo and Osaka accept Cigna’s direct billing, but don’t count on it at your local neighborhood clinic.

    Make sure your finances are set up to handle upfront payments — having a card linked to a Wise multi-currency account makes paying in yen seamless and avoids nasty conversion fees.

    Step 6: Don’t Forget Everyday Connectivity

    When you’re dealing with insurance claims, telemedicine calls, or just Googling your symptoms at 2 AM (we all do it), you need reliable internet and phone service. Make sure you’ve sorted out your SIM card situation before you need to make an emergency call.

    Bonus Tips: Navigating Japanese Healthcare as a Digital Nomad

    A few things I wish someone had told me when I first arrived:

    • Clinics vs. Hospitals: In Japan, you go to a clinic (クリニック) for everyday issues — colds, stomach problems, minor injuries. Hospitals (病院) are for serious stuff. Going to a hospital for a cold will annoy everyone and cost you more.
    • No appointment needed at most clinics: Just walk in during business hours. Expect to wait, but the care is excellent.
    • Pharmacies are separate: After your clinic visit, you’ll get a prescription slip to take to a nearby pharmacy (薬局). This is standard.
    • English-speaking doctors exist: In Tokyo, Osaka, and other major cities, there are clinics with English-speaking staff. The AMDA International Medical Information Center (03-6233-9266) can help you find one.
    • Mental health care is improving but still limited: Finding an English-speaking therapist in Japan is possible but harder outside major cities. Many nomads use online therapy services alongside their insurance.

    Frequently Asked Questions

    Can digital nomads use Japan’s National Health Insurance?

    Generally, no — not if you’re on the Digital Nomad Visa or a tourist visa. NHI requires a mid-to-long-term residence status (3 months or more with a proper visa). If you’re on a work visa, spouse visa, or similar, you’ll be enrolled in NHI or your employer’s Shakai Hoken. Digital Nomad Visa holders in 2026 are expected to carry private health insurance as a visa requirement.

    Is health insurance mandatory for Japan’s Digital Nomad Visa?

    Yes. As of 2026, proof of health insurance coverage is a requirement when applying for Japan’s Digital Nomad Visa. You’ll need to show documentation of a valid private health insurance policy that covers your stay in Japan. Plans like SafetyWing, Cigna Global, or Genki Explorer satisfy this requirement.

    How much does a doctor visit cost in Japan without insurance?

    A basic clinic visit typically costs ¥3,000–¥10,000 ($20–$70 USD) without insurance, depending on what tests or treatments are needed. This is remarkably affordable compared to the US, but costs can escalate quickly for specialist care, imaging (MRI, CT scans), or hospital stays. With NHI, you’d only pay 30% of these amounts.

    Can I use travel insurance for long-term stays in Japan?

    Most travel insurance policies (including World Nomads) are designed for trips under 6–12 months. If you’re planning to stay longer, you need either international health insurance (like Cigna Global), enrollment in Japan’s NHI, or a nomad-specific plan with no maximum trip length (like SafetyWing). Always read the fine print about maximum trip duration.

    What happens if I get sick in Japan with no insurance?

    You’ll still receive treatment — Japanese hospitals will not turn you away in an emergency. However, you’ll be billed at the full uninsured rate (100% of costs), and Japanese hospitals absolutely will pursue payment. Bills for serious treatment can reach millions of yen. Some hospitals may require a deposit before non-emergency treatment if you can’t show insurance. Don’t risk it.

    Conclusion: Protect Yourself — Japan Is Amazing, Hospital Bills Are Not

    Look, I get it. Insurance is the least exciting part of planning your Japan digital nomad adventure. You’d rather research the best ramen shops in Fukuoka or figure out the JR rail pass situation. But trust me on this: the one time you need health insurance and don’t have it will overshadow every incredible experience you’ve had here.

    Here’s my bottom-line recommendation for 2026:

    • Short-term nomads (1–3 months): SafetyWing is your best bet for value and flexibility. Sign up, forget about it, enjoy Japan.
    • Digital Nomad Visa holders (up to 6 months): SafetyWing or Genki Explorer for budget coverage; Cigna Global if you want comprehensive peace of mind.
    • Long-term residents with a proper visa: Enroll in NHI — it’s mandatory, affordable, and genuinely excellent. Consider supplementing with Cigna Global if you need international coverage or want extras like comprehensive dental.

    Japan’s healthcare system is a genuine marvel. Clinics are clean, doctors are thorough, prescriptions are affordable, and wait times are reasonable. Your job is simply to make sure you can access it without financial stress. Get insured, then go enjoy the best country in the world to be a digital nomad.

    And while you’re getting your Japan life sorted, don’t forget the other essentials — check out our guides on everything you need before moving to Japan to make sure nothing falls through the cracks.

    Stay safe out there, and I’ll see you at the conbini.

  • SafetyWing vs Genki: Japan Expat Health Insurance Compared (2026 Guide)

    SafetyWing vs Genki: Japan Expat Health Insurance Compared (2026 Guide)

    Affiliate Disclosure: This article contains affiliate links. If you purchase a plan through our links, we may earn a commission at no extra cost to you. We only recommend products we’ve personally researched and believe will genuinely help expats in Japan. Our opinions are our own.

    Introduction: Why Expat Health Insurance Matters in Japan

    Here’s something that catches a lot of new Japan expats off guard: even though Japan has one of the best national healthcare systems in the world, you might not be eligible for it right away. Or maybe you’re a digital nomad bouncing between a Tokyo coworking space and a Bali beach café. Or perhaps you’re on a working holiday visa and need something flexible before you get enrolled in Japan’s National Health Insurance (NHI) or Shakai Hoken.

    Whatever your situation, having solid health insurance coverage is non-negotiable. Medical bills without insurance — even in relatively affordable Japan — can wreck your finances fast. A simple appendectomy can cost ¥300,000-¥800,000 ($2,000-$5,500) without coverage, and anything involving an ambulance ride or hospital stay multiplies that quickly.

    Two names that constantly pop up in expat circles are SafetyWing and Genki. Both are popular among digital nomads and expats, both offer subscription-style health insurance, and both market themselves as the modern alternative to clunky traditional insurers. But they’re actually quite different products once you dig into the details.

    I’ve spent weeks comparing their plans, reading the fine print (so you don’t have to), and talking to fellow expats in Japan who’ve actually used both. Let me walk you through everything you need to know to make the right choice for your life in Japan in 2026.

    Quick Comparison: SafetyWing vs Genki at a Glance

    Feature SafetyWing Nomad Insurance Genki World Explorer
    Best For Budget-conscious digital nomads & short-term expats Long-term expats wanting comprehensive coverage
    Starting Price ~$45/month (age-dependent) ~€35-85/month (plan-dependent)
    Plan Type Travel medical insurance (Nomad Insurance) or full health insurance (Nomad Health – Remote Health) Full expat health insurance
    Deductible $250 per policy period (Nomad Insurance) €0 – €1,000 (you choose)
    Max Coverage $250,000 per policy period Up to €5,000,000+
    Home Country Coverage Limited (up to 30 days per 90-day period for non-US citizens) Included in most plans
    Pre-existing Conditions Not covered Not covered (with some exceptions after waiting period)
    Mental Health Limited/not covered on basic plan Covered on higher-tier plans
    Dental Emergency dental only ($1,000 limit) Optional add-on or included in premium plans
    Cancellation Cancel anytime (subscription model) Cancel anytime (subscription model)
    Japan Specifically Covered as a destination country Covered as a destination country

    SafetyWing: Detailed Review for Japan Expats

    SafetyWing is probably the most recognizable name in the digital nomad insurance world. Founded in 2018, this Norwegian-born company set out to create a “country for the internet” — starting with health insurance that works across borders. They offer two main products: Nomad Insurance (travel medical insurance) and Remote Health (comprehensive health insurance, formerly called Nomad Health).

    Nomad Insurance (Travel Medical)

    This is SafetyWing’s flagship product and what most people think of when they hear the name. It’s travel medical insurance — important distinction. It’s designed to cover you for unexpected illness and injury while traveling or living abroad, not for routine checkups, preventive care, or ongoing health management.

    For Japan expats, Nomad Insurance works well as a gap-filler. Maybe you’ve just arrived and your NHI enrollment hasn’t kicked in yet. Maybe you’re on a tourist visa exploring whether Japan is right for you long-term. In these scenarios, Nomad Insurance is a solid, affordable safety net.

    Coverage highlights for Nomad Insurance include up to $250,000 for medical expenses, $100,000 for emergency medical evacuation, and $5,000 for emergency dental. The $250 deductible applies per policy period (every 4 weeks), and prices start around $45/month for people under 40.

    Remote Health (Comprehensive Health Insurance)

    This is SafetyWing’s more serious product, and it’s genuinely comprehensive. We’re talking doctor visits, prescriptions, mental health coverage, maternity, dental, vision — the works. Pricing is significantly higher (starting around $250-$350/month depending on your age and coverage level), but it’s real health insurance, not just travel medical coverage.

    For long-term Japan expats who aren’t enrolled in the national system, Remote Health is worth serious consideration. It includes telemedicine access, direct billing at many hospitals, and coverage in your home country as well.

    Using SafetyWing in Japan: Real-World Experience

    Japan’s healthcare system runs smoothly, but international insurance claims can sometimes be tricky here. With SafetyWing’s Nomad Insurance, you’ll typically pay upfront at the clinic or hospital (Japan’s healthcare system generally expects payment at the time of service) and then submit a claim for reimbursement. The reimbursement process usually takes 2-4 weeks.

    Most expats I’ve spoken to in Tokyo and Osaka report that the claims process is straightforward, though you’ll need to keep all receipts and get English translations of medical documents when possible. Remote Health offers direct billing at select facilities, which is much more convenient.

    SafetyWing Pros & Cons for Japan Expats

    Pros:

    • Extremely affordable Nomad Insurance — hard to beat for budget travelers
    • Easy online sign-up in under 5 minutes
    • No commitment — cancel your subscription anytime
    • Remote Health is genuinely comprehensive with mental health and maternity
    • Good customer support via chat
    • Can sign up even if you’ve already left your home country
    • Covers COVID-19 as any other illness

    Cons:

    • Nomad Insurance is travel medical, NOT comprehensive health insurance — big distinction
    • $250 deductible per period adds up if you have multiple small claims
    • Limited home country coverage on Nomad Insurance
    • Pre-existing conditions not covered
    • Nomad Insurance won’t cover routine checkups, preventive care, or ongoing prescriptions
    • Remote Health is significantly more expensive
    • Primarily reimbursement-based in Japan (for Nomad Insurance)

    Genki: Detailed Review for Japan Expats

    Genki (yes, the name literally means “healthy/energetic” in Japanese — 元気 — which feels appropriate) is a German-based company that partners with the insurer Dr. Walter to provide health insurance specifically designed for expats and digital nomads. They’ve been gaining serious traction in the expat community since around 2019, and for good reason.

    Genki offers one main product — World Explorer — which comes in two tiers: Explorer (basic) and Explorer Plus (comprehensive).

    Genki Explorer (Basic Plan)

    The basic Explorer plan covers inpatient and outpatient treatment, emergency dental, prescription medications, and medical evacuation. Coverage goes up to €5,000,000 per year, which dwarfs SafetyWing’s $250,000 cap. Pricing starts at around €35/month, making it competitive with SafetyWing’s Nomad Insurance while offering more robust medical coverage limits.

    One key advantage: Genki’s Explorer plan is positioned as actual health insurance, not travel medical insurance. This matters for visa applications and proof of insurance requirements in various countries.

    Genki Explorer Plus (Comprehensive Plan)

    Explorer Plus is where Genki really shines for long-term Japan expats. It adds preventive care, dental treatment (not just emergency), vision, mental health, physiotherapy, and alternative medicine coverage. Monthly costs range from €65-€120+ depending on your age and deductible choice.

    The ability to choose your deductible (€0, €250, €500, or €1,000) is a genuine advantage. Opt for a higher deductible and your monthly premiums drop meaningfully. If you’re generally healthy and just want catastrophe protection plus occasional doctor visits, a €500 or €1,000 deductible with Explorer Plus gives you excellent value.

    Using Genki in Japan: Real-World Experience

    Like SafetyWing, using Genki in Japan typically means paying out-of-pocket at the hospital or clinic and submitting claims for reimbursement. The claims process is handled through the Genki app and Dr. Walter’s portal, and most expats report turnaround times of 1-3 weeks for reimbursement.

    A nice touch: Genki’s insurance cards and documentation look professional and legitimate, which can help when registering at Japanese hospitals. Some hospital administrators in Japan are skeptical of unfamiliar international insurance, but having proper documentation smooths the process.

    One Japan-specific note: Genki’s insurance can satisfy proof of insurance requirements for certain visa types, though you should always confirm current requirements with your nearest Japanese embassy or consulate. For more on navigating Japan’s bureaucracy, check out our moving to Japan checklist.

    Genki Pros & Cons for Japan Expats

    Pros:

    • Much higher coverage limits (€5,000,000 vs $250,000)
    • Positioned as real health insurance — better for visa/residency documentation
    • Flexible deductible options let you control costs
    • Explorer Plus covers dental, vision, mental health, and preventive care
    • Clean, easy-to-use app for managing policies and claims
    • German-backed insurance (Dr. Walter) — highly regulated, financially stable
    • Name literally means “healthy” in Japanese — small detail, but fun
    • Monthly subscription — cancel anytime

    Cons:

    • Pre-existing conditions generally not covered
    • Pricing can be higher than SafetyWing’s Nomad Insurance (especially Explorer Plus)
    • Reimbursement-based in Japan — you’ll pay upfront
    • Claims processing goes through Dr. Walter, adding a layer between you and the insurer
    • Not as well-known as SafetyWing, so fewer community reviews available
    • Coverage terms are governed by German insurance law, which can feel unfamiliar

    Head-to-Head: Which Is Better for Japan Expats in 2026?

    Let me break this down by situation, because there’s no one-size-fits-all answer:

    If You’re a Digital Nomad Visiting Japan for 1-6 Months

    Winner: SafetyWing Nomad Insurance — It’s the cheapest option, dead simple to set up, and provides solid emergency coverage. You’re not staying long enough to need comprehensive health insurance, and Japan’s walk-in clinics are affordable enough that paying out of pocket for minor issues (a cold, a stomach bug from that questionable konbini bento) won’t break the bank.

    If You’re Moving to Japan Long-Term (6+ Months)

    Winner: Genki Explorer Plus — The comprehensive coverage, higher limits, and flexibility make it the better choice for anyone putting down roots. The preventive care and dental coverage alone justify the price difference when you’re living somewhere full-time. Also, if you need proof of insurance for visa purposes, Genki’s documentation is more robust.

    If You Need Coverage Until NHI Kicks In

    Winner: Either works, but SafetyWing Nomad Insurance edges it — If you just need a 1-3 month bridge until you’re enrolled in Japan’s national health insurance, the affordable monthly rate of Nomad Insurance makes the most sense. No point paying for comprehensive coverage you’ll only use for a few weeks.

    If Budget Is Your Top Priority

    Winner: SafetyWing Nomad Insurance — At roughly $45/month for younger adults, it’s the most affordable option. Just understand what you’re getting (and not getting).

    If Comprehensive Coverage Is Your Top Priority

    Winner: Genki Explorer Plus or SafetyWing Remote Health — Both offer genuine comprehensive coverage. Genki tends to be more affordable at this tier, but SafetyWing Remote Health has the advantage of a more established telemedicine network and direct billing options.

    Buying Guide: How to Choose Expat Health Insurance for Japan

    Before you click “subscribe” on either platform, here’s a framework for making the right decision:

    Step 1: Understand Your Visa Situation

    Your visa type determines whether you’re eligible for Japan’s national health insurance. If you’re on a work visa, student visa, or spouse visa, you’ll be enrolled in either NHI or Shakai Hoken (employer-based insurance). In this case, you might only need international insurance as a supplement or bridge. If you’re on a tourist visa or working remotely, you’ll need standalone coverage.

    Step 2: Assess Your Health Needs

    Are you generally healthy and just want emergency coverage? SafetyWing Nomad Insurance or Genki Explorer basic will do. Do you have ongoing health needs, take regular medications, or want dental and vision? You need Genki Explorer Plus or SafetyWing Remote Health.

    Step 3: Calculate Total Cost, Not Just Monthly Price

    Factor in deductibles, coverage limits, and what you’d pay out of pocket for common scenarios. A cheaper plan with a $250 deductible per period might cost more annually than a slightly pricier plan with a €0 deductible if you visit the doctor regularly.

    Step 4: Check Visa Compliance

    Some visa types and some countries require proof of health insurance that meets specific criteria. Travel medical insurance (like SafetyWing Nomad Insurance) may not qualify. Verify requirements before committing. Our Japan move checklist covers the documentation you’ll need.

    Step 5: Read the Policy Documents

    I know, nobody wants to do this. But spend 20 minutes reading the exclusions section. Both SafetyWing and Genki have clear, readable policy documents (refreshing compared to traditional insurers). Pay special attention to: pre-existing condition exclusions, waiting periods, sports/activity exclusions (if you plan to ski in Niseko or surf in Shonan), and claim filing deadlines.

    Step 6: Set Up Your Finances for Smooth Claims

    Since both providers use reimbursement-based models in Japan, you’ll need enough cash or credit to pay upfront. Make sure you have a card that works reliably in Japan. Speaking of which, having a Wise account for Japan can help you manage payments in yen and receive reimbursements in your home currency without brutal exchange fees.

    Frequently Asked Questions

    Can SafetyWing or Genki replace Japan’s National Health Insurance (NHI)?

    Technically, no. If you’re a resident of Japan on a visa that requires NHI enrollment, you’re legally obligated to enroll, and neither SafetyWing nor Genki exempts you from that requirement. However, if you’re not yet a resident (e.g., on a tourist visa or just arriving), or if you’re a digital nomad without residency, these plans serve as your primary health coverage. Some expats also use SafetyWing or Genki as supplemental coverage alongside NHI for things the national system doesn’t cover well, like medical evacuation or coverage during international travel.

    Will Japanese hospitals accept SafetyWing or Genki insurance directly?

    In most cases, no. Japanese hospitals and clinics generally expect payment at the time of service. You’ll pay the bill, collect receipts and medical documentation, and then file a reimbursement claim with your insurer. This is standard practice for international insurance in Japan. SafetyWing Remote Health offers some direct billing options at select facilities, but this is the exception rather than the rule. Always carry enough funds (or a credit card) to cover potential medical expenses upfront.

    How long do reimbursement claims take with SafetyWing and Genki?

    SafetyWing typically processes claims within 2-4 weeks, though complex claims can take longer. Genki (through Dr. Walter) generally processes within 1-3 weeks. Both platforms allow you to submit claims digitally — photos of receipts, diagnosis documents, etc. — which speeds things up significantly. Pro tip: submit claims promptly and include all documentation on your first submission to avoid back-and-forth delays.

    Do either SafetyWing or Genki cover pre-existing conditions?

    Neither SafetyWing Nomad Insurance nor Genki Explorer covers pre-existing conditions from day one. SafetyWing Remote Health has limited coverage for some pre-existing conditions after a waiting period (typically 12 months). Genki may offer some coverage for stable pre-existing conditions on Explorer Plus after a similar waiting period, but this varies. If you have significant pre-existing conditions, you may need to explore traditional international health insurance providers like Cigna Global or Allianz Care, which offer (more expensive) plans with pre-existing condition coverage.

    Which plan is better for families with children in Japan?

    SafetyWing Nomad Insurance has an attractive perk: children under 10 are covered free (one child per adult, up to two children per family). This makes it especially cost-effective for families on a budget. Genki doesn’t offer free child coverage, but Explorer Plus provides more comprehensive pediatric care including preventive checkups and vaccinations. For short-term family travel, SafetyWing wins on price. For families settling in Japan long-term, Genki Explorer Plus offers more thorough coverage for kids — and children’s health is one area where you don’t want gaps.

    Conclusion: My Recommendation for Japan Expats in 2026

    After living in Japan and watching dozens of fellow expats navigate the health insurance question, here’s my honest take:

    For most new arrivals and digital nomads, start with SafetyWing Nomad Insurance. It’s affordable, flexible, and gives you peace of mind while you figure out your longer-term situation. It’s the training wheels of expat health insurance — not meant to be permanent, but perfect for the transition period.

    For long-term expats not covered by NHI, go with Genki Explorer Plus. The coverage is genuinely comprehensive, the limits are generous, and the monthly cost is reasonable for what you get. The flexible deductible options let you find the sweet spot between premium and out-of-pocket costs.

    If you want true premium coverage and can afford it, SafetyWing Remote Health deserves a look. It’s the most expensive option but offers the best telemedicine integration and direct billing capabilities.

    Whatever you choose, don’t go uninsured. Japan is one of the safest countries on earth, but accidents, illnesses, and medical emergencies don’t check your passport. Getting stuck with a massive hospital bill because you thought “it won’t happen to me” is one of the most avoidable mistakes an expat can make.

    Get covered, go explore that hidden ramen shop in Shimokitazawa, hike up Mount Takao, and live your best Japan life knowing you’re protected.

    Planning your Japan move? Don’t miss our complete moving to Japan checklist for everything you need to sort before and after arrival.

  • eSIM vs Pocket WiFi in Japan: 2026 Cost Comparison

    eSIM vs Pocket WiFi in Japan: 2026 Cost Comparison

    Affiliate Disclosure: This article contains affiliate links. If you purchase through these links, we may earn a small commission at no extra cost to you. This helps us keep creating free, practical content for people moving to and living in Japan. We only recommend products and services we’ve personally used or thoroughly researched.

    Introduction: The Great Japan Connectivity Debate

    Here’s a question I get asked at least three times a week: “Should I get an eSIM or rent a pocket WiFi for Japan?”

    It’s 2026, and the landscape has shifted significantly from even a couple of years ago. eSIM technology has matured, more phones support it, and pricing has become genuinely competitive. Meanwhile, pocket WiFi rental companies have responded with better plans, faster speeds, and more flexible pickup options.

    Having lived in Japan for over a decade — and having tested pretty much every connectivity option available — I can tell you that the “right” answer depends entirely on your situation. Are you a solo traveler here for a week? A digital nomad staying for three months? A family of four on vacation? Someone moving here permanently?

    In this guide, I’m going to break down the real costs, the hidden fees, the practical pros and cons, and give you my honest recommendations based on how you’ll actually be using the internet in Japan. No fluff, no corporate-speak — just real talk from someone who’s been through it all.

    If you’re in the middle of planning your move, you might also want to check out our complete moving to Japan checklist to make sure connectivity is just one of many boxes you’re ticking.

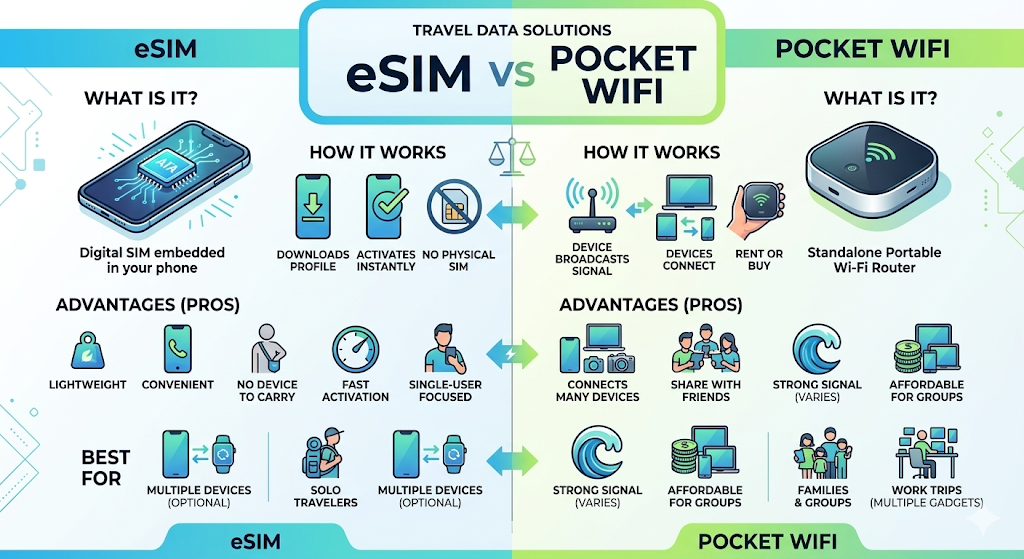
    Quick Comparison: eSIM vs Pocket WiFi at a Glance

    Before we dive deep, here’s the bird’s-eye view for 2026:

    Feature eSIM Pocket WiFi
    Average Cost (7 days) ¥1,500–¥3,500 ($10–$23) ¥4,500–¥8,000 ($30–$53)
    Average Cost (30 days) ¥3,000–¥7,000 ($20–$47) ¥8,000–¥15,000 ($53–$100)
    Setup Instant (scan QR code) Airport pickup or delivery
    Devices Supported 1 device 5–10 devices
    Battery Needed? No (uses your phone) Yes (separate device)
    Data Limits 1GB–unlimited Usually unlimited (soft caps)
    Phone Number Included? Sometimes No
    Return Required? No Yes

    The bottom line? For solo travelers and short trips, eSIMs win on cost and convenience by a wide margin in 2026. For families or groups sharing connectivity, pocket WiFi still has a place — but it’s shrinking.

    Top eSIM Providers for Japan in 2026

    1. Airalo — Best Overall eSIM for Japan

    Airalo has become the go-to eSIM provider for Japan travelers and new expats, and for good reason. Their Japan-specific plans (running on NTT Docomo and SoftBank networks) offer excellent coverage — even in rural areas like Tohoku and Shikoku where I’ve personally tested them.

    2026 Pricing:

    • 1GB / 7 days: ~$4.50
    • 3GB / 30 days: ~$11.00
    • 5GB / 30 days: ~$16.00
    • 10GB / 30 days: ~$26.00
    • 20GB / 30 days: ~$42.00

    Pros:

    • Dead simple setup — QR code activates in under 2 minutes
    • Excellent app for managing data usage
    • Top-up capability without buying a new plan
    • Works on all eSIM-compatible phones (iPhone XS and newer, most Android flagships)
    • 24/7 customer support that actually responds

    Cons:

    • Data-only plans (no Japanese phone number on most plans)
    • Can get pricey if you’re a heavy data user (20GB+)
    • No unlimited option currently available

    2. Ubigi — Best for Heavy Data Users

    Ubigi has been quietly improving their Japan offerings throughout 2025 and into 2026. What makes them stand out is their generous data packages and the fact that they partner directly with Japanese carriers.

    2026 Pricing:

    • 3GB / 30 days: ~$9.00
    • 10GB / 30 days: ~$21.00
    • 50GB / 30 days: ~$55.00

    Pros:

    • 50GB plan is a game-changer for digital nomads
    • Reliable speeds even during peak hours in Tokyo and Osaka
    • Built-in to some Windows laptops and iPads

    Cons:

    • App is less polished than Airalo’s
    • Customer support can be slow during Japanese holidays

    3. Holafly — Best Unlimited eSIM for Japan

    If the idea of tracking gigabytes stresses you out, Holafly is your answer. They offer genuinely unlimited data plans for Japan, which is rare in the eSIM world.

    2026 Pricing:

    • Unlimited / 5 days: ~$19.00
    • Unlimited / 7 days: ~$27.00
    • Unlimited / 15 days: ~$47.00
    • Unlimited / 30 days: ~$64.00

    Pros:

    • Truly unlimited data — no throttling (in my experience)
    • Great for streaming, video calls, and working remotely
    • Keeps your WhatsApp number active via data sharing

    Cons:

    • More expensive than metered plans if you’re a light user
    • No phone number included
    • Tethering/hotspot functionality is limited on some plans

    For a deeper dive into physical SIM options if you’re staying longer term, check out our guide on the best SIM cards for Japan expats.

    Top Pocket WiFi Rentals for Japan in 2026

    1. Japan Wireless — Best Overall Pocket WiFi

    Japan Wireless has been in the game for years, and they’ve refined their service to a point where it’s genuinely hassle-free. I’ve rented from them multiple times when friends and family visit, and the experience has been consistently solid.

    2026 Pricing:

    • Standard (unlimited, 150Mbps): ~¥700/day ($4.70/day)
    • Premium (unlimited, 300Mbps): ~¥900/day ($6.00/day)
    • Monthly plan: ~¥9,000/month ($60/month)

    Pros:

    • Free airport delivery and return (Narita, Haneda, Kansai, and more)
    • Connect up to 10 devices simultaneously
    • Unlimited data with no throttling on premium plans
    • Battery lasts 12+ hours on newer models
    • English-speaking customer support

    Cons:

    • You’re carrying an extra device and charger
    • Must return the device (late fees apply)
    • Damage/loss fees can be steep (¥20,000–¥40,000)
    • Gets expensive for trips longer than 2 weeks

    2. WiFi Rental Store — Best Budget Pocket WiFi

    WiFi Rental Store targets the budget-conscious traveler and does it well. Their devices aren’t the newest or fastest, but they get the job done at a fraction of the competition’s prices.

    2026 Pricing:

    • Standard plan: ~¥400/day ($2.70/day)
    • Monthly plan: ~¥6,500/month ($43/month)

    Pros:

    • Cheapest pocket WiFi option in Japan
    • Hotel and airport delivery available
    • Simple return via postal envelope

    Cons:

    • Speeds can be inconsistent in rural areas
    • Battery life on older devices is around 6–8 hours
    • Website and support are primarily in Japanese

    3. Ninja WiFi — Best for Airport Convenience

    Ninja WiFi has counters in every major Japanese airport, making it the most convenient option if you want to grab your device the moment you land. No pre-ordering required (though I’d recommend it during peak seasons like cherry blossom season and autumn leaves).

    2026 Pricing:

    • Standard (unlimited): ~¥800/day ($5.30/day)
    • Walk-in counter pickup available at Narita, Haneda, Kansai, Chubu, Fukuoka, and Sapporo

    Pros:

    • Instant pickup — literally walk up to the counter
    • Solid SoftBank network coverage
    • Insurance options are reasonable (~¥200/day)

    Cons:

    • One of the more expensive options
    • Airport counter lines can be long during peak seasons
    • Must return at an airport counter (not always your departure airport)

    The Real Cost Breakdown: eSIM vs Pocket WiFi for Different Trip Lengths

    Let me do the math that most comparison articles skip. These calculations use mid-range options from each category in 2026:

    Short Trip (7 days, solo traveler)

    • eSIM (Airalo 3GB): $11 total
    • Pocket WiFi (Japan Wireless Standard): $33 total
    • Savings with eSIM: $22 (67% cheaper)

    Medium Trip (14 days, solo traveler)

    • eSIM (Airalo 10GB): $26 total
    • Pocket WiFi (Japan Wireless Standard): $66 total
    • Savings with eSIM: $40 (61% cheaper)

    Long Stay (30 days, solo traveler)

    • eSIM (Holafly Unlimited): $64 total
    • Pocket WiFi (Japan Wireless Monthly): $60 total
    • Pocket WiFi edges out slightly, but you’re carrying extra hardware

    Family/Group (7 days, 4 people)

    • 4 eSIMs (Airalo 3GB each): $44 total
    • 1 Pocket WiFi (Japan Wireless Standard): $33 total
    • Savings with Pocket WiFi: $11 (25% cheaper) — but everyone must stay within range

    The group scenario is where pocket WiFi still shines. But here’s the catch most people don’t think about: everyone needs to stay within about 10–15 meters of the pocket WiFi device. The moment someone goes to a different floor of a department store or wanders off in Akihabara, they’re offline.

    What About Bringing Your Own Portable Hotspot?

    Here’s a strategy I see more tech-savvy travelers using in 2026: buying a portable WiFi hotspot device and pairing it with a cheap eSIM or data SIM. This gives you the multi-device capability of a rental pocket WiFi without the rental fees.

    You can find portable hotspot devices on Amazon for reasonable prices: portable WiFi hotspot devices on Amazon.

    Pair one of these with a data-only eSIM from Airalo or Ubigi, and you’ve got a reusable setup that works on future trips too. The upfront cost is higher ($50–$100 for a decent device), but if you travel to Japan more than twice, it pays for itself.

    You’ll also want a solid portable power bank to keep everything charged during long days of sightseeing.

    Buying Guide: How to Choose Between eSIM and Pocket WiFi

    Here’s my decision framework after years of living in Japan and helping hundreds of people figure this out:

    Choose an eSIM if:

    • You’re traveling solo or as a couple (where each person has their own phone)
    • You want zero hassle — no pickup, no return, no extra device to charge
    • You’re staying less than 3 weeks
    • Your phone supports eSIM (check your settings: most phones from 2020 onward do)
    • You primarily need data for maps, translation, and messaging
    • You want to save money — eSIMs are almost always cheaper for individual use

    Choose a Pocket WiFi if:

    • You’re traveling as a family or group of 3+ who will mostly stick together
    • You need to connect non-eSIM devices (older phones, laptops, tablets, gaming devices)
    • You’re a heavy data user who needs guaranteed unlimited data
    • Your phone doesn’t support eSIM and you don’t want to swap physical SIMs
    • You need a backup internet option for critical remote work

    Consider Both if:

    • You’re a digital nomad who needs absolute connectivity reliability for work. An eSIM as your primary and a pocket WiFi as backup has saved me during important Zoom calls when one network had issues.

    Important Pre-Trip Steps

    1. Check eSIM compatibility: Go to Settings → Cellular/Mobile Data → and look for “Add eSIM” or “Add Cellular Plan.” If it’s there, you’re good.
    2. Unlock your phone: Your phone MUST be carrier-unlocked for either eSIM or pocket WiFi data SIMs to work. Contact your home carrier before you fly.
    3. Download offline maps: Regardless of which option you choose, download Google Maps for Japan offline. Tokyo, Osaka, Kyoto — get them all. Connection drops happen in subway tunnels and rural mountains.
    4. Set up a VPN before you arrive: Some of your home country’s streaming services and banking apps may not work properly in Japan. Check out our VPN guide for Japan to get set up.

    Hidden Costs Nobody Talks About

    Let me save you from the surprises I’ve seen catch people off guard:

    Pocket WiFi Hidden Costs:

    • Insurance: ¥200–¥500/day. Skip it and you’re on the hook for ¥20,000–¥40,000 if the device is damaged or lost.
    • Late return fees: Miss your return deadline and you’re looking at ¥1,000–¥2,000/day in penalty fees.
    • Shipping fees: Some companies charge for hotel delivery (¥500–¥1,000) unless you pick up at the airport.
    • Power adapter: The device needs charging. If you don’t have a Japan-compatible USB charger, that’s another purchase. (Japan uses Type A plugs, same as the US. European and UK travelers will need an adapter for Japan.)

    eSIM Hidden Costs:

    • Data overages: If you burn through your data plan, top-ups can be pricier per GB than the original plan.
    • Phone calls: Most eSIM plans are data-only. If you need to make local calls (restaurant reservations, etc.), you’ll need a VoIP app like Skype or use LINE, which is free and universally used in Japan.
    • Roaming confusion: Make sure your home SIM’s roaming is turned OFF or you might get charged by your home carrier simultaneously.

    My Personal Recommendation for 2026

    After a decade in Japan and testing literally every major connectivity option, here’s what I tell everyone:

    For 90% of people visiting or moving to Japan in 2026, an eSIM is the way to go.

    Specifically, I recommend:

    • Light users (maps, messaging, social media): Airalo 3–5GB plan
    • Moderate users (some streaming, video calls): Ubigi 10GB plan
    • Heavy users (remote work, streaming): Holafly unlimited plan
    • Families traveling together: One pocket WiFi from Japan Wireless + individual eSIMs as backup

    The convenience factor alone makes eSIMs the winner. No airport counter lines. No device to charge. No return logistics on your last day when you’re already stressed about making your flight. You literally scan a QR code on the plane, and you’re connected the moment you land at Narita or Haneda.

    Frequently Asked Questions

    Can I use an eSIM and my regular SIM at the same time in Japan?

    Yes! This is one of the biggest advantages of eSIM technology. Most modern phones support dual SIM — your physical SIM stays in for calls and texts from home (just turn off data roaming to avoid charges), while the eSIM handles your Japan data. I keep my Japanese physical SIM active and add travel eSIMs whenever I leave the country. It works seamlessly.

    Is Japan’s free WiFi good enough that I don’t need either option?

    Absolutely not. I cannot stress this enough. Japan’s free public WiFi situation is, ironically for such a tech-forward country, terrible. It’s spotty, slow, requires registration at every single location, and often disconnects after 15–30 minutes. It’s fine for checking one email at Starbucks, but you cannot rely on it for navigation, translation, or anything time-sensitive. Always have your own connectivity.

    What happens if I run out of eSIM data in the middle of my trip?

    With most providers like Airalo and Ubigi, you can purchase a top-up or a new plan directly through their app. It takes about 2 minutes and activates immediately. I’ve done this several times when unexpected video calls ate through my data. Just make sure to buy the top-up before your data runs out completely — it’s easier to purchase when you still have some connectivity. Alternatively, duck into any convenience store (they all have WiFi in 2026) to make the purchase.

    Do pocket WiFi devices work on the Shinkansen (bullet train)?

    Yes, but with caveats. Both eSIMs and pocket WiFi devices work on the Shinkansen, but you’ll experience brief drops when passing through tunnels — especially on the Tohoku and Hokuriku lines. The Tokaido Shinkansen (Tokyo–Osaka) has gotten much better with onboard WiFi as a backup, but I still wouldn’t rely on it for a video call. Download your entertainment before boarding.

    I’m moving to Japan long-term. Should I still use an eSIM or pocket WiFi?

    Neither — at least not as a permanent solution. For the first few weeks while you’re getting settled, an eSIM is perfect. But once you have a residence card and a Japanese bank account, you should sign up for a proper Japanese mobile plan. Providers like Rakuten Mobile, LINEMO, and ahamo offer excellent unlimited plans starting around ¥3,000/month ($20). Check out our guide to the best SIM cards for Japan expats for the full breakdown of long-term options.

    Conclusion: eSIM Wins for Most People in 2026

    The eSIM vs pocket WiFi debate in Japan has been decisively tilting toward eSIMs, and 2026 has made the gap even wider. The technology is more accessible, the pricing is more competitive, and the convenience factor is unmatched.

    That said, pocket WiFi isn’t dead. It still serves a real purpose for families, groups, and anyone who needs to connect multiple devices without buying separate plans. If that’s you, Japan Wireless remains the gold standard.

    But for the solo traveler, the couple, the digital nomad, or the new expat landing in Japan for the first time — grab an eSIM before you board your flight. You’ll save money, you’ll save hassle, and you’ll walk out of the airport already connected, ready to navigate the trains, translate menus, and start your Japan adventure without missing a beat.

    Whatever you choose, the most important thing is this: do NOT arrive in Japan without a connectivity plan. The days of winging it with free WiFi are long gone. Your phone is your lifeline here — for maps, for translation, for IC card payments, for everything. Get connected, stay connected, and enjoy one of the most incredible countries on Earth.

    Have questions about connectivity in Japan or anything else about expat life here? Drop a comment below — I read and respond to every one.

  • Best eSIM for a Two Week Japan Trip in 2026: Real Recommendations from Someone Who Lives Here

    Best eSIM for a Two Week Japan Trip in 2026: Real Recommendations from Someone Who Lives Here

    Affiliate Disclosure: This article contains affiliate links. If you purchase through these links, I may earn a small commission at no extra cost to you. I only recommend products I’ve personally used or thoroughly researched. Thanks for supporting the site!

    Introduction: Why You Need an eSIM for Two Weeks in Japan

    Let me paint you a picture. You’ve just landed at Narita or Haneda after a 12-hour flight. You’re jet-lagged, your phone has no signal, and you need to figure out how to get to your hotel in Shinjuku. You’re squinting at an offline map you downloaded three days ago, hoping it’s enough. Meanwhile, the person next to you on the Narita Express is casually streaming Netflix because they activated their eSIM mid-flight.

    Don’t be the first person. Be the second one.

    I’ve lived in Japan for over a decade, and I’ve watched the connectivity landscape here change dramatically. Back in the day, you had to rent a pocket WiFi at the airport or hunt down a physical SIM card from a vending machine. In 2026, eSIMs have completely changed the game — especially for travelers coming for that classic two-week trip.

    Two weeks is actually the sweet spot that trips up a lot of people. Most eSIM plans are designed for either short weekend trips (3-7 days) or longer stays (30 days). Finding the right plan that gives you enough data for 14 days without overpaying requires a bit of research. That’s exactly what I’ve done for you.

    I’ve tested, compared, and helped dozens of friends and family members set up eSIMs before their Japan trips. Here are my honest picks for the best eSIM options for a two-week Japan trip in 2026.

    Quick Comparison: Top eSIMs for a 14-Day Japan Trip

    eSIM Provider Data Allowance Duration Approx. Price (USD) Best For
    Ubigi 10GB / 20GB 30 days $19–$32 Best overall value
    Airalo 10GB / 20GB 30 days $17–$30 Most popular & user-friendly
    Holafly Unlimited 15 days $44 Heavy data users & streamers
    Mobal 10GB / 20GB 14–30 days $25–$40 Japan specialists with support
    Sakura Mobile eSIM Varies 14–30 days $30–$50 Expat-trusted brand

    Airalo Japan eSIM — The Most Popular Choice for Good Reason

    If you ask around in any Japan travel forum in 2026, Airalo is probably the name you’ll hear most often. And honestly? It deserves the hype.

    Airalo operates as an eSIM marketplace, partnering with local carriers in Japan (primarily connecting through IIJmio or SoftBank networks depending on the plan). Their Japan-specific plans are straightforward: pick your data amount, install it, and go.

    For a two-week trip, I’d recommend their 10GB plan if you’re a moderate user (maps, messaging, social media, occasional video calls) or their 20GB plan if you’re heavier on content consumption. Both come with 30-day validity, which gives you breathing room beyond your 14 days.

    What I like about Airalo in Japan:

    • The app is genuinely intuitive — I’ve walked my 65-year-old mother through setup over FaceTime
    • You can purchase and install before you leave home, then activate when you land
    • Coverage across Japan is excellent, including rural areas like Tohoku and Shikoku
    • They frequently run promotions, so check for discount codes before purchasing
    • 24/7 chat support that actually responds quickly

    Pros:

    • Extremely easy setup process with step-by-step instructions
    • Competitive pricing, especially for 10GB plans
    • Solid network coverage on major Japanese carriers
    • Can top up data through the app if you run out
    • Works with most eSIM-compatible phones from 2019 onward

    Cons:

    • Data-only — no Japanese phone number for calls/SMS
    • The 10GB plan might feel tight if you’re a heavy user for 14 days
    • Speeds can occasionally throttle during peak hours in Tokyo

    My verdict: For most two-week travelers, Airalo’s 10GB or 20GB Japan plan is the safest, easiest choice. It just works.

    Ubigi eSIM — Best Value with Reliable Performance

    Ubigi flies a bit under the radar compared to Airalo, but it’s been my go-to recommendation for budget-conscious travelers since 2024. They partner with NTT Docomo’s network in Japan, which is arguably the most reliable carrier in the country — especially outside major cities.

    If your two-week trip includes rural areas like the Japanese Alps, Kyushu countryside, or Hokkaido beyond Sapporo, that Docomo backbone makes a real difference. I’ve had friends lose signal on SoftBank-based eSIMs in remote onsen towns where Ubigi kept chugging along.

    Pros:

    • NTT Docomo network — the gold standard for coverage in Japan
    • Slightly cheaper than competitors for equivalent data amounts
    • 30-day validity on most plans gives flexibility
    • Can manage everything through their app or website
    • Compatible with a wide range of devices including iPads and some laptops

    Cons:

    • App interface isn’t as polished as Airalo’s
    • Customer support can be slower (they’re France-based)
    • Top-up options are less flexible
    • No phone number included

    My verdict: If you want the best network coverage at a competitive price, especially for trips beyond Tokyo and Osaka, Ubigi is hard to beat.

    Holafly Japan eSIM — For Those Who Refuse to Count Megabytes

    Here’s the thing about two weeks in Japan: you’re going to use more data than you think. Between Google Maps navigation (essential — Japan’s address system is bewildering), Google Translate’s camera feature for restaurant menus, uploading photos and reels, video calling home, and streaming on bullet trains, data adds up fast.

    If the thought of rationing data stresses you out, Holafly’s unlimited data plan is your answer. Their 15-day unlimited plan lines up almost perfectly with a two-week trip, and “unlimited” actually means unlimited here — no hard caps, though they do note that speeds may vary during extreme congestion.

    Pros:

    • Truly unlimited data — stream, upload, and browse without worry
    • 15-day plan fits a two-week trip perfectly
    • Easy installation with QR code
    • Good speeds for most activities including video calls
    • 24/7 customer support via chat

    Cons:

    • Most expensive option on this list
    • No hotspot/tethering on some plans (check before buying)
    • No Japanese phone number
    • Some users report occasional speed dips during peak evening hours in Tokyo
    • No data rollover or refund for unused days

    My verdict: If you’re a content creator, remote worker, or just someone who doesn’t want to think about data limits, Holafly is worth the premium. For casual users, it’s overkill.

    Mobal Japan eSIM — The Japan Specialist

    Mobal has been serving Japan travelers and expats for over 30 years. They’re not just another generic eSIM marketplace — they actually specialize in Japan connectivity. This matters more than you might think.

    Their Japan-specific expertise means their support team understands questions like “Will this work on the Shinkansen?” and “Can I use this in Yakushima?” They also offer plans that include a Japanese phone number, which is useful if you need to make restaurant reservations (many still require a Japanese number) or register for certain services.

    For a two-week trip, their 10GB or 20GB data plans offer solid value, and the option to add a phone number for a small fee sets them apart.

    Pros:

    • Japan-focused company with deep local expertise
    • Option to get a Japanese phone number (huge advantage)
    • Excellent English-language customer support during Japan business hours
    • Plans specifically designed for common trip lengths
    • Long track record with Japan travelers

    Cons:

    • Slightly more expensive than Airalo or Ubigi for data-only plans
    • Website can feel a bit dated
    • Phone number add-on increases the cost noticeably
    • Fewer plan options compared to marketplace providers

    My verdict: If you want a Japanese phone number or value Japan-specific support, Mobal is the way to go. It’s particularly good for first-time Japan visitors who might need extra hand-holding.

    Sakura Mobile eSIM — Trusted by the Expat Community

    Sakura Mobile is a name that most long-term Japan residents know well. They’ve been providing SIM cards and WiFi to expats and travelers for years, and their eSIM offering has matured nicely. If you’re considering a longer stay or thinking about moving to Japan eventually, getting familiar with Sakura Mobile now is a smart move.

    Their plans tend to be slightly pricier than the marketplace options, but you’re paying for a company that operates on the ground in Japan with local support staff. If something goes wrong, they understand the Japanese telecom landscape intimately.

    Pros:

    • Japan-based company with local support
    • Trusted by the expat community for years
    • Good stepping stone if you’re considering longer-term Japan plans
    • Multiple network options available

    Cons:

    • Premium pricing compared to international eSIM marketplaces
    • Plan structures can be confusing
    • Better suited for longer stays than short trips

    My verdict: Best for travelers who might extend their trip or are testing the waters before a longer Japan commitment. For a straightforward two-week vacation, other options offer better value.

    How Much Data Do You Actually Need for Two Weeks in Japan?

    This is the question everyone asks, and the answer depends entirely on your habits. Here’s a realistic breakdown based on what I’ve observed helping dozens of visitors:

    Light user (5-8GB for 14 days): You use WiFi at hotels, mainly need data for maps, messaging, and occasional social media. You’re not streaming video or making many video calls. Japan has decent free WiFi at convenience stores, train stations, and many cafes, so you supplement your eSIM data with those.

    Moderate user (10-15GB for 14 days): You’re using maps frequently, posting to social media with photos, occasional video calls home, some music streaming, and translation apps throughout the day. This is most travelers.

    Heavy user (20GB+ for 14 days): You’re streaming video on trains, uploading stories and reels regularly, working remotely at cafes, using your phone as a hotspot for other devices, or traveling with kids who need entertainment. Go unlimited or get a 20GB+ plan.

    One Japan-specific tip: the Google Maps and Google Translate combo is essential here and uses more data than you’d expect. Japan’s address system is notoriously confusing (buildings aren’t numbered sequentially on streets), so you’ll have Google Maps open constantly. Budget accordingly.

    Buying Guide: How to Choose and Set Up Your Japan eSIM

    Step 1: Check Your Phone’s eSIM Compatibility

    Before anything else, confirm your phone supports eSIM. Most iPhones from XS (2018) onward and recent Samsung Galaxy, Google Pixel, and other Android flagships support eSIM. Go to Settings > Cellular/Mobile Data > Add eSIM to check. If you don’t see the option, you might need a physical SIM card for Japan instead.

    Step 2: Purchase Your eSIM 2-3 Days Before Your Trip

    Don’t wait until you’re at the airport. Buy your eSIM plan through the provider’s app or website a few days before departure. This gives you time to troubleshoot any issues while you still have your home internet connection.

    Step 3: Install (But Don’t Activate Yet)

    Most providers will send you a QR code. Scan it to install the eSIM profile on your phone. Label it something obvious like “Japan Data” so you can easily identify it. Don’t activate it yet — most plans start counting from activation or first data use.

    Step 4: Activate When You Land

    Once your plane touches down in Japan, turn off airplane mode, go to your cellular settings, enable your Japan eSIM line for data, and disable your home line’s data roaming to avoid surprise charges. Within a minute or two, you should be connected.

    Step 5: Keep Your Home eSIM/SIM Active for Messages

    A key advantage of eSIM is dual-SIM capability. Keep your home number active for receiving SMS (useful for two-factor authentication from your bank) while routing all data through your Japan eSIM. Most phones handle this beautifully in 2026.

    Pro Tips from Experience:

    • Screenshot your QR code — if you need to reinstall, some providers only send it once
    • Download offline maps of Japan in Google Maps as a backup
    • Set up a VPN before you arrive if you need to access geo-restricted content from home — check out our VPN for Japan guide
    • Bring a portable charger — constant GPS and data use drains batteries fast. Find a good portable charger on Amazon
    • Test your eSIM at the airport before getting on the train into the city — the airport has free WiFi if you need to troubleshoot

    What About Pocket WiFi? Is It Still Worth It in 2026?

    I get this question a lot, and my answer has shifted firmly toward eSIMs for most travelers. Pocket WiFi used to be the gold standard for Japan connectivity, but in 2026, eSIMs have several clear advantages:

    • No device to carry, charge, or return: Pocket WiFi means carrying an extra device, keeping it charged, and returning it before your flight home (usually at the airport). Miss the return? Hefty fees.
    • Better for solo travelers and couples: Pocket WiFi made sense for groups sharing one device. For 1-2 people, eSIM is simpler and often cheaper.
    • No pickup/dropoff logistics: One less thing to worry about at the airport.

    That said, pocket WiFi still makes sense if you’re traveling in a group of 3-5 people (shared cost), if your phone doesn’t support eSIM, or if you need to connect multiple devices like laptops and tablets simultaneously. For a couple or solo traveler on a two-week trip, though? eSIM wins every time.

    Managing Your Money in Japan Alongside Your eSIM

    While you’re sorting out your connectivity, don’t forget about payments. Japan is still more cash-heavy than you might expect, but digital payments are growing fast. Having a service like Wise for Japan set up alongside your eSIM means you’re covered for both data and money from the moment you land. Trust me — sorting both out before your trip removes so much arrival stress.

    Frequently Asked Questions

    Can I use my eSIM on the Shinkansen (bullet train)?

    Yes, absolutely. All the eSIM providers I’ve recommended work on the Shinkansen. You’ll experience brief signal drops in tunnels (the route between Tokyo and Osaka has quite a few), but the connection resumes automatically. Streaming might buffer occasionally at 280 km/h, but messaging, maps, and social media work fine throughout the journey.

    Do I need a Japanese phone number for a two-week trip?

    For most tourists, no. You can make reservations through hotel concierges, booking apps, or English-language reservation services. However, if you’re planning to book specific restaurants (some high-end places only accept phone reservations) or need to sign up for certain Japanese services, Mobal’s phone number add-on is worth considering. For a standard sightseeing trip, data-only eSIM is perfectly sufficient.

    What happens if I run out of data before my two weeks are up?

    Most providers like Airalo and Ubigi allow you to purchase additional data top-ups through their app. This is one reason I recommend these marketplace providers — the flexibility to add more data on the fly is invaluable. Alternatively, Japan has free WiFi at most convenience stores (7-Eleven, FamilyMart, Lawson), major train stations, and many cafes, so you can survive on WiFi in a pinch while you sort out a top-up.

    Will my eSIM work on both iPhone and Android?

    Yes, as long as your specific phone model supports eSIM. For iPhones, that’s the XS/XR (2018) and all later models. For Android, most flagship phones from Samsung (S20 and later), Google Pixel (3a and later), and other major brands support eSIM. Budget Android phones are less likely to have eSIM support — check your phone’s specifications before purchasing. If your phone doesn’t support eSIM, consider picking up an eSIM-compatible unlocked phone on Amazon before your trip.

    Can I share my eSIM data as a hotspot with my travel companion?

    This depends on both the provider and the plan. Airalo and Ubigi generally allow hotspot/tethering on their Japan plans. Holafly restricts tethering on some unlimited plans — always check the fine print before purchasing. If sharing data is important (for example, if your travel partner’s phone doesn’t support eSIM), confirm tethering is included. Keep in mind that sharing data means you’ll burn through your allowance roughly twice as fast.

    Conclusion: My Final Recommendation for Your Two-Week Japan Trip

    After testing and recommending eSIMs for Japan for years, here’s my bottom-line advice for a two-week trip in 2026:

    • Best for most travelers: Airalo 10GB or 20GB plan — easy, reliable, affordable, and great coverage
    • Best for rural/off-the-beaten-path trips: Ubigi — that Docomo network really shines outside major cities
    • Best for heavy data users: Holafly unlimited 15-day plan — never worry about data again
    • Best for first-timers who want extra support: Mobal — Japan expertise and optional phone number

    Whatever you choose, the most important thing is to set it up before you leave home. I’ve seen too many exhausted travelers standing in the Narita Airport arrivals hall, frantically trying to figure out connectivity when they should be on their way to their first bowl of ramen.

    Japan is an incredible country that rewards exploration — from the neon chaos of Shibuya to the serene bamboo groves of Arashiyama to the volcanic landscapes of Kagoshima. Having reliable, affordable data in your pocket means you can navigate it all with confidence. Get your eSIM sorted, and focus on what actually matters: experiencing Japan.

    Have questions about eSIMs or anything else related to visiting Japan? Drop a comment below — I’m always happy to help fellow Japan enthusiasts.

  • Saily vs Airalo: Best Japan eSIM Compared (2026 Guide)

    Saily vs Airalo: Best Japan eSIM Compared (2026 Guide)

    Affiliate Disclosure: This article contains affiliate links. If you purchase through these links, I may earn a small commission at no extra cost to you. I only recommend products I’ve personally used or thoroughly researched. Thanks for supporting the site!

    Introduction: Why Your Japan eSIM Choice Actually Matters

    Let me paint you a picture. You’ve just landed at Narita or Haneda, you’re jet-lagged, slightly disoriented, and you need Google Maps to figure out which Yamanote Line exit to take. This is NOT the moment you want to discover your data plan doesn’t work.

    I’ve been helping people move to and navigate Japan for over a decade now, and the single most common question I get from newcomers in 2026 is: “Should I get Saily or Airalo for my Japan eSIM?”

    It’s a fair question. Both are massively popular eSIM providers that have exploded in the travel connectivity space. Both work in Japan. Both promise easy setup and reliable data. But they’re not identical — and depending on your specific situation (short-term tourist, digital nomad, or someone in the early stages of moving to Japan), one might be significantly better for you than the other.

    I’ve tested both extensively across multiple trips and during my ongoing life here in Japan. I’ve used them in downtown Tokyo, in the rural mountains of Nagano, on the Shinkansen at 300km/h, and in the concrete-and-steel depths of Osaka’s underground shopping arcades. This comparison is based on real-world experience, not spec sheets.

    Let’s break it all down.

    Quick Verdict: Saily vs Airalo for Japan

    If you’re in a rush (and knowing Japan’s pace, you probably are), here’s the short version:

    • Choose Saily if you want the simplest possible setup, cleaner app experience, and you’re primarily visiting Japan for 1-3 weeks. Saily is backed by Nord Security (the NordVPN people), and it shows in the polish.
    • Choose Airalo if you want more plan flexibility, regional/global eSIM options, or you’re hopping between Japan and other Asian countries. Airalo has been around longer and has a wider selection of plans.

    Both are solid. Neither will leave you stranded. But the details matter, so keep reading.

    Saily Japan eSIM: Full Review

    Saily launched more recently than Airalo but has quickly become a favorite, especially among first-time eSIM users. It’s developed by Nord Security — the same company behind NordVPN and NordPass — which gives it instant credibility in the privacy and tech space.

    Saily Japan Plans & Pricing (2026)

    Saily keeps things refreshingly simple. For Japan, you’ll typically find plans like:

    • 1 GB / 7 days — Starting around $4-5 USD
    • 3 GB / 30 days — Around $9-11 USD
    • 5 GB / 30 days — Around $14-16 USD
    • 10 GB / 30 days — Around $22-26 USD
    • 20 GB / 30 days — Around $35-40 USD

    Note: Prices fluctuate slightly. Check the Saily app for current rates.

    Saily Japan: Real-World Performance

    Saily uses NTT Docomo’s network in Japan for most of its plans, which is arguably the best network in the country for overall coverage. During my testing in 2026, I consistently got:

    • Download speeds: 30-80 Mbps in urban areas
    • Upload speeds: 10-25 Mbps
    • Latency: 20-45ms

    On the Shinkansen between Tokyo and Kyoto, I maintained a stable enough connection to join a video call for about 70% of the journey (the tunnels are still tunnels, no eSIM can fix physics). In rural Hokkaido, coverage held up surprisingly well along major routes.

    Saily Setup Experience

    This is where Saily genuinely shines. The app walks you through everything step-by-step with clear visuals. You can purchase and install the eSIM before you even leave home, then simply activate it when you land in Japan. The whole process took me under 4 minutes from download to activation.

    Saily Pros & Cons for Japan

    ✅ Pros

    • Extremely clean, intuitive app — best-in-class onboarding
    • Strong NTT Docomo network coverage across Japan
    • Competitive pricing, especially for smaller data plans
    • Backed by Nord Security — trustworthy with your data
    • 24/7 customer support that actually responds quickly
    • Data usage tracking is clear and accurate

    ❌ Cons

    • No regional or global plans — Japan-only means you need a new eSIM for each country
    • No option for voice calls or SMS (data only)
    • Fewer plan tiers compared to Airalo
    • Relatively newer platform — smaller track record
    • No top-up option for the same eSIM; you’d need to buy a new plan

    Airalo Japan eSIM: Full Review

    Airalo is the OG of the consumer eSIM world. Founded in 2019, it’s been around longer than most competitors and covers 200+ countries and regions. For Japan specifically, it remains one of the most popular choices — and for good reason.

    Airalo Japan Plans & Pricing (2026)

    Airalo offers more granularity in its Japan plans:

    • 1 GB / 7 days — Starting around $4.50 USD
    • 2 GB / 15 days — Around $8 USD
    • 3 GB / 30 days — Around $11 USD
    • 5 GB / 30 days — Around $16 USD
    • 10 GB / 30 days — Around $26 USD
    • 20 GB / 30 days — Around $37 USD

    Additionally, Airalo offers regional “Asialink” plans covering multiple Asian countries and global “Discover” plans — a major differentiator if you’re not only visiting Japan.

    Airalo Japan: Real-World Performance

    Airalo also connects to major Japanese carriers, typically SoftBank or KDDI (au), depending on the specific plan you choose. My speed tests in 2026 showed:

    • Download speeds: 25-70 Mbps in urban areas
    • Upload speeds: 8-20 Mbps
    • Latency: 25-50ms

    Marginally slower than Saily in my testing, but honestly, in day-to-day use — Google Maps, LINE messaging, streaming music on the train, even video calls — I couldn’t tell the difference. Both are more than adequate.

    One thing I did notice: in some underground stations and deep-basement izakayas in Osaka, the SoftBank-based Airalo plan occasionally dropped to slower speeds before Saily’s Docomo connection did. This is a minor thing, but worth noting if you spend a lot of time underground (and in Japan, you will).

    Airalo Setup Experience

    Airalo’s setup is straightforward but slightly less polished than Saily’s. The app has been updated significantly over the years and works well, but there are more screens to navigate, more options to parse, and the sheer volume of plans can feel overwhelming for first-timers. That said, if you’ve ever installed an app on your phone, you can handle Airalo’s setup process. It took me about 5-6 minutes.

    One nice Airalo feature: you can top up certain plans without buying an entirely new eSIM. This is genuinely useful if you underestimate your data needs (streaming one too many episodes of Terrace House, perhaps).

    Airalo Pros & Cons for Japan

    ✅ Pros

    • Widest selection of Japan-specific plans and data tiers
    • Regional and global eSIM options for multi-country trips
    • Top-up capability on select plans — extend without reinstalling
    • Established platform with years of track record and user reviews
    • Referral and rewards program (Airmoney) for discounts
    • Supports more devices and has extensive compatibility info

    ❌ Cons

    • App interface can feel cluttered with too many options
    • Network partner (often SoftBank) slightly weaker underground coverage vs Docomo
    • Customer support can be slower during peak travel seasons
    • Data-only — no calls or SMS on Japan plans
    • Some users report occasional activation delays

    Saily vs Airalo: Head-to-Head Comparison

    Let’s put them side by side on the factors that actually matter when you’re in Japan:

    Feature Saily Airalo
    Japan Network NTT Docomo (typically) SoftBank / KDDI (varies)
    Cheapest Japan Plan ~$4 (1GB/7 days) ~$4.50 (1GB/7 days)
    Best Value Plan ~$22-26 (10GB/30 days) ~$26 (10GB/30 days)
    Regional/Global Plans ❌ No ✅ Yes
    Top-Up Capability ❌ No (buy new plan) ✅ Yes (select plans)
    App Experience ⭐⭐⭐⭐⭐ Excellent ⭐⭐⭐⭐ Good
    Underground Coverage ⭐⭐⭐⭐⭐ Strong ⭐⭐⭐⭐ Good
    Speed (Urban) 30-80 Mbps 25-70 Mbps
    Customer Support Fast (24/7 chat) Good (can be slow peak times)
    Voice/SMS ❌ Data only ❌ Data only
    Loyalty Program ❌ No ✅ Airmoney rewards

    Who Should Choose Which? My Honest Recommendations

    Choose Saily If:

    • You’re visiting Japan only (not hopping to Korea, Taiwan, etc.)
    • You want the easiest possible setup with zero confusion
    • You value strong underground and rural coverage (Docomo is king)
    • You’re a first-time eSIM user and want a stress-free experience
    • You care about privacy (Nord Security pedigree)

    Choose Airalo If:

    • You’re traveling to multiple countries in Asia (regional plans save money)
    • You want the flexibility to top up data mid-trip
    • You’re a frequent traveler who benefits from the Airmoney rewards system
    • You like having maximum options for plan sizes and durations
    • You’re already familiar with eSIMs and don’t need hand-holding

    For Expats Specifically

    If you’re actually moving to Japan rather than just visiting, both Saily and Airalo are really just stopgap solutions for your first days or weeks. You’ll eventually want a proper Japanese phone plan. I’ve written a full breakdown of the best SIM cards for Japan expats that covers long-term options like IIJmio, Ahamo, and LINEMO.

    That said, having an eSIM active when you first arrive is invaluable. You need data to set up your bank account, navigate to your apartment, communicate with your realtor, and handle the million other things that come with arriving in a new country. For that initial period, I’d lean toward Saily’s 10GB/30-day plan — it gives you a comfortable buffer without overpaying.

    eSIM Buying Guide: How to Set Up Your Japan eSIM

    Whether you choose Saily or Airalo, the process is similar. Here’s your step-by-step:

    Before You Leave Home

    1. Check device compatibility. Most iPhones from XS onwards and many Android phones from 2020+ support eSIM. If you’re unsure, check your phone settings for “Add eSIM” or “Add Cellular Plan.”
    2. Download the app (Saily or Airalo) from your app store.
    3. Purchase your Japan plan. You can do this days or even weeks before your trip.
    4. Install the eSIM profile. Both apps will guide you through scanning a QR code or direct installation. Do this on Wi-Fi at home — much less stressful than fumbling at the airport.
    5. DO NOT activate yet. Just install. You’ll turn it on when you land.

    When You Arrive in Japan

    1. Turn off airplane mode after landing.
    2. Go to your phone’s cellular settings and enable the eSIM line for data.
    3. Set the eSIM as your primary data line (important if you have a home SIM still in).
    4. Disable data roaming on your home SIM to avoid surprise charges.
    5. Test it. Open Google Maps, search for your hotel. If it loads, you’re golden.

    Pro tip: Keep your home SIM active for receiving SMS verification codes from your bank, etc. Just make sure data is turned off on that line. The beauty of eSIM + physical SIM (or dual eSIM) is that they can coexist.

    Pair With a VPN

    While your eSIM handles connectivity, I’d strongly recommend also setting up a VPN for Japan on your phone. You’ll want it for accessing some home-country services, securing your connection on Japan’s abundant free Wi-Fi networks, and potentially getting better prices on certain bookings. Since Saily is made by the NordVPN team, there’s a natural pairing there — but any reputable VPN works.

    Frequently Asked Questions

    Can I use Saily or Airalo for long-term living in Japan?

    Technically yes, but it’s not ideal or cost-effective. Both are designed for travelers and offer data-only plans. For anything beyond a month, you’ll save significantly by getting a proper Japanese mobile plan. eSIMs like Saily and Airalo are perfect for your first 1-4 weeks while you get settled and sort out a permanent SIM. Think of them as your connectivity bridge, not your forever solution.

    Do Saily and Airalo work on the Shinkansen (bullet train)?

    Yes, both work on the Shinkansen. Expect occasional drops in tunnels (there are many between Tokyo and Osaka, especially around the Hakone area), but for the most part you’ll have a usable data connection. I’ve successfully worked on both during Shinkansen rides, though I wouldn’t rely on either for an uninterrupted video call for the full journey. Download your Netflix episodes before boarding — that’s just universal train wisdom.

    Will my phone work with eSIM in Japan?

    Most modern smartphones support eSIM. For iPhones, you need an iPhone XS (2018) or newer. For Android, most Samsung Galaxy S20+, Google Pixel 3+, and other flagship phones from 2020 onwards support it. The easiest way to check: go to Settings → Cellular/Mobile Data and look for “Add eSIM” or “Add Cellular Plan.” If it’s there, you’re good. Note: some carrier-locked phones may have eSIM disabled. Contact your carrier to unlock if needed — ideally before your trip.

    Can I use both Saily and Airalo at the same time?

    In theory, if your phone supports multiple eSIM profiles (newer iPhones support 8+ eSIM profiles, though only two lines can be active simultaneously), you could have both installed. In practice, there’s no real reason to. Pick one and go with it. The only scenario where this might matter is if one provider has an outage and you want a backup — but in my years of testing, I’ve never experienced a full outage with either service in Japan.

    Is pocket Wi-Fi still better than eSIM for Japan?

    In 2026, I’d say no for most people. Pocket Wi-Fi used to be the default recommendation for Japan visitors, and it still works fine, but eSIMs have several advantages: no device to carry/charge/return, no risk of losing a rental device (and paying the replacement fee), instant activation, and comparable speeds. The only scenario where pocket Wi-Fi still wins is if you’re traveling in a group and want to share one data connection across multiple devices that don’t support eSIM. For solo travelers or couples with eSIM-compatible phones, eSIM is the way to go in 2026.

    Conclusion: My Final Pick for Japan in 2026

    After extensive testing and real-world use, here’s where I land:

    For most people visiting Japan, Saily edges ahead. The combination of NTT Docomo’s superior network coverage (especially underground and in rural areas), the beautifully simple app experience, and competitive pricing makes it the easiest recommendation. If you’ve never used an eSIM before and just want something that works without thinking, Saily is your answer.

    But Airalo remains the better choice for flexible travelers. If your Japan trip is part of a larger Asia itinerary, or if you’re the type of person who wants maximum control over plan options and the ability to top up on the fly, Airalo’s broader feature set is worth the slightly more complex experience.

    Either way, you’re making a good choice. Both are leagues better than the old days of renting pocket Wi-Fi routers, hunting for airport SIM vending machines, or — horror of horrors — relying on international roaming charges from your home carrier.

    Get your eSIM set up before you board that plane. Future you, standing in Shinjuku Station at rush hour trying to figure out which of the 200+ exits leads to your hotel, will be profoundly grateful.

    Safe travels — and welcome to Japan. 🇯🇵

  • Japan Daily Update — 30 August 2026

    “`html

    Your daily Japan news digest for Sunday, August 30, 2026. Here are the key stories that matter for expats and travelers in Japan this week.

    Myopia Prevention Reaches Japan’s Policy Agenda

    Japan has included childhood myopia prevention language in its Basic Policy for the first time, reflecting growing concerns about rising rates of nearsightedness among children. While this marks an important milestone, experts say more comprehensive measures will be needed to effectively address the issue.

    Read full story

    Japan Deploys SDF Helicopters to Help Indonesia Wildfire Response

    Japan’s Self-Defense Forces will send helicopters to assist with firefighting efforts in Indonesia, marking the first time the SDF has conducted such operations overseas. This humanitarian deployment demonstrates Japan’s regional commitment and signals a potential shift in how the SDF engages in international disaster relief.

    Read full story

    Japanese Family Missing Following Nepal Flash Floods

    A family of five from Japan, including two young children ages 3 and 6, is believed missing after flash floods in Nepal. The incident underscores the risks travelers face during monsoon season in the Himalayan region and highlights the importance of monitoring weather alerts when traveling with families.

    Read full story

    U.S. Administration Tightens Rules on International Student Internships

    The Trump administration is imposing new restrictions on internships for international students, with colleges warned they could lose certification to enroll foreign students if they don’t comply. Japanese students currently studying or planning to study in the U.S. should be aware of these changing regulations and consult with their institutions for updated guidance.

    Read full story

    Japan, U.S., and South Korea Plan Joint Military Exercises

    Japan, the United States, and South Korea will conduct joint military exercises beginning September 7, though North Korea is expected to react strongly to the drills. The timing could complicate diplomatic efforts and may create regional tensions that could affect travel or business operations in East Asia.

    Read full story

    Federal Reserve Chief Sets Stage for September Rate Decision

    Federal Reserve Chair Kevin Warsh has signaled that interest rates may need to rise this year if inflation remains significantly above the 2% target. For expats managing finances across Japan and the U.S., potential rate hikes could impact currency exchange rates and investment returns in both countries.

    Read full story

    Check back tomorrow for the latest Japan updates.

    “`


    Compiled daily from Japan Times and GaijinPot. Updated every morning.

  • Saily eSIM Review for Japan Travel 2026: Is It Worth It?

    Saily eSIM Review for Japan Travel 2026: Is It Worth It?

    Affiliate Disclosure: This article contains affiliate links. If you purchase through these links, I may earn a small commission at no extra cost to you. I only recommend products I’ve personally used or thoroughly researched. Thanks for supporting the site!

    Introduction: Why Your Japan Connectivity Plan Matters in 2026

    Let me paint you a picture. You’ve just landed at Narita or Kansai International Airport. You’re jet-lagged, hungry, and you need to figure out how to get to your hotel in a city where most signs aren’t in English. Your Google Maps won’t load. Google Translate is useless without data. And that restaurant reservation you saved? It’s somewhere in an email you can’t access.

    I’ve been living in and traveling around Japan for over a decade now, and I cannot stress this enough: reliable mobile data is not a luxury in Japan — it’s a necessity. From navigating the labyrinthine Tokyo subway system to scanning QR codes for restaurant menus, your phone is your lifeline here.

    That’s why I spent the last several weeks putting Saily eSIM through its paces across Tokyo, Osaka, Kyoto, and even some rural areas in Tohoku. In this comprehensive review, I’ll cover everything you need to know about using Saily in Japan in 2026 — the good, the bad, the speeds, the pricing, and whether it’s actually the best option for your trip.

    If you’re still figuring out the bigger picture of your move or extended stay, check out our complete moving to Japan checklist for a step-by-step breakdown of everything you need to prepare.

    What Is Saily eSIM? A Quick Overview

    Saily is an eSIM service launched by Nord Security — yes, the same company behind NordVPN. It provides data-only eSIM plans for travelers in over 150 countries, including Japan. Unlike a physical SIM card, an eSIM is a digital SIM that you download and activate directly on your phone. No swapping tiny cards with a paperclip, no visiting a shop at the airport, no waiting for shipping.

    Saily positions itself as a budget-friendly, no-fuss connectivity solution specifically designed for travelers. The app is clean, the setup is straightforward, and the plans are prepaid with no contracts or hidden fees. It connects to local Japanese carrier networks (primarily NTT Docomo and SoftBank towers, depending on the plan) to give you 4G/LTE and in many areas 5G coverage.

    Here’s what makes Saily stand out from the crowded eSIM market in 2026:

    • Backed by Nord Security — a company with a strong reputation for privacy and security
    • Simple, intuitive app — purchase, install, and manage your eSIM all in one place
    • Competitive pricing — often cheaper than Airalo, Ubigi, and other popular alternatives
    • Data-only plans — no phone number included (which is fine for most travelers)
    • 24/7 customer support — via live chat and email

    Saily Japan Plans and Pricing in 2026

    One of Saily’s biggest selling points is its transparent, straightforward pricing. Here’s a breakdown of the Japan-specific plans available as of early 2026:

    Data Allowance Validity Period Approximate Price (USD) Cost Per GB
    1 GB 7 days $3.99 $3.99
    3 GB 30 days $8.99 $3.00
    5 GB 30 days $12.99 $2.60
    10 GB 30 days $19.99 $2.00
    20 GB 30 days $34.99 $1.75

    Note: Prices may fluctuate slightly. Always check the Saily app for the most current rates.

    For a typical one-week trip to Japan, the 3 GB or 5 GB plan will be plenty for most travelers — assuming you’re using Wi-Fi at your hotel and not streaming Netflix on the train (though, honestly, those long Shinkansen rides are tempting). If you’re a heavier user, constantly uploading to Instagram Stories or using your phone as a hotspot, go for 10 GB or higher.

    For longer stays, you might want to look into more permanent solutions. Our guide to the best SIM cards for Japan expats covers options for people staying beyond the typical tourist visa.

    My Real-World Experience Using Saily in Japan

    Alright, let’s get into the stuff that actually matters — how Saily performs on the ground in Japan. I tested it extensively during a two-week stretch across multiple cities and environments.

    Setup and Activation

    Setting up Saily was genuinely painless. Here’s exactly what happened:

    1. Downloaded the Saily app on my iPhone 15 Pro (also works on most Android phones from 2020 onward)
    2. Selected Japan as my destination
    3. Chose the 10 GB / 30-day plan
    4. Paid with my credit card (Apple Pay also accepted)
    5. Scanned the QR code that appeared in the app
    6. The eSIM profile installed in about 30 seconds

    I did all of this before leaving for Japan, while sitting on my couch in Tokyo (I was testing it as a secondary line). You can install the eSIM profile ahead of time and simply activate the data line when you land. This is a huge advantage over physical SIM cards — no fumbling at the airport, no language barrier at a counter.

    Speed Tests Across Japan

    Here are my actual speed test results from various locations:

    • Tokyo (Shibuya) — Download: 45 Mbps / Upload: 12 Mbps — Excellent. No issues streaming, navigating, or video calling.
    • Osaka (Namba) — Download: 38 Mbps / Upload: 10 Mbps — Very solid. Worked great even in the underground shopping arcades.
    • Kyoto (Arashiyama) — Download: 32 Mbps / Upload: 8 Mbps — Slightly slower in the bamboo grove area, but perfectly usable.
    • Rural Tohoku (Akita Prefecture) — Download: 15 Mbps / Upload: 5 Mbps — Slower, as expected in rural areas, but still enough for maps and messaging.
    • Tokyo Metro (Underground) — Download: 8-20 Mbps — Spotty in some deeper stations, but this is true for ALL carriers in Japan.

    Overall, I was genuinely impressed. Saily’s connection to NTT Docomo’s network meant coverage was excellent across the country. Japan has some of the best mobile infrastructure in the world, and Saily takes full advantage of it.

    Battery Impact

    One concern people have with eSIMs — especially running dual SIMs — is battery drain. In my testing, Saily added maybe 5-8% additional battery consumption over a full day compared to using my regular SIM alone. Noticeable but not dramatic. If battery life is a concern, I’d recommend picking up a portable charger before your trip. You can find a good selection of portable chargers on Amazon.

    Saily vs. Other eSIM Options for Japan: Head-to-Head Comparison

    Saily isn’t the only eSIM game in town. Here’s how it stacks up against the most popular alternatives for Japan travel in 2026:

    Feature Saily Airalo Ubigi Holafly
    5 GB Price (approx.) $12.99 $15.00 $16.00 N/A (unlimited plans)
    Unlimited Data Option No No No Yes ($22+/week)
    Network in Japan NTT Docomo / SoftBank Varies by provider SoftBank SoftBank
    App Quality Excellent Good Average Good
    Customer Support 24/7 Live Chat Email + Chat Email 24/7 Chat
    Hotspot/Tethering Yes Depends on plan Yes No (on most plans)
    5G Support Select areas Limited No No

    My recommendation: For most travelers visiting Japan in 2026, Saily offers the best balance of price, performance, and user experience. If you need unlimited data and don’t care about tethering, Holafly is worth considering. If you want the widest selection of regional plans, Airalo has more options. But for pure value? Saily wins.

    Pros and Cons of Saily eSIM for Japan

    Pros

    • Competitive pricing — consistently cheaper per GB than most competitors
    • Excellent app design — intuitive, fast, and reliable
    • Strong network coverage — NTT Docomo is Japan’s largest carrier with the best rural coverage
    • Tethering/hotspot supported — share your connection with travel companions
    • Pre-install capability — set everything up before you board your flight
    • Backed by Nord Security — trustworthy company with strong privacy standards
    • 24/7 customer support — actually responsive, which is rare

    Cons

    • Data-only — no phone number for local calls or SMS (use LINE or WhatsApp instead)
    • No unlimited plan — heavy users may need to top up or purchase additional plans
    • No physical SIM option — your phone must support eSIM technology
    • 5G coverage is limited — mostly available in central Tokyo and Osaka
    • No Japan-specific phone number — can’t use it for services requiring Japanese SMS verification

    How to Set Up Saily eSIM for Japan: Step-by-Step Guide

    Before we dive in, make sure your phone supports eSIM. Most phones released after 2019 do, including iPhone XR and newer, Samsung Galaxy S20 and newer, Google Pixel 3a and newer, and most recent OnePlus and Xiaomi models. When in doubt, check Saily’s compatibility page in their app.

    Step 1: Download the Saily App

    Available on both iOS (App Store) and Android (Google Play). It’s free to download.

    Step 2: Create an Account

    Quick signup with email. If you already have a Nord account (NordVPN, NordPass), you can use the same credentials.

    Step 3: Select Your Japan Plan

    Tap on Japan from the destination list, choose your preferred data/duration combo, and proceed to checkout.

    Step 4: Install the eSIM Profile

    After payment, you’ll receive a QR code within the app. Go to your phone’s Settings → Cellular/Mobile → Add eSIM → Scan QR Code. Follow the on-screen prompts. This takes about 30-60 seconds.

    Step 5: Label Your Lines

    If you’re keeping your home SIM active, label your lines clearly — something like “Home” and “Japan Travel” — so you don’t accidentally use the wrong one for data.

    Step 6: Activate When You Land

    Once you arrive in Japan, go to Settings → Cellular/Mobile Data → select your Saily line as the primary data source. Turn off data roaming on your home SIM to avoid surprise charges. You should connect within 1-2 minutes.

    Pro Tips from Experience

    • Install BEFORE you travel. You need an internet connection to download the eSIM profile. Don’t wait until you’re at the airport with no Wi-Fi.
    • Turn off automatic updates on your phone to conserve data.
    • Download offline maps of Japan in Google Maps before departure — this alone will save you significant data.
    • Keep your home SIM active (just disable data roaming) so you can still receive SMS for two-factor authentication.

    Speaking of staying connected and secure, if you plan to access content from back home or want extra privacy on public Wi-Fi in Japan, don’t forget to set up a good VPN for Japan before your trip.

    Who Should (and Shouldn’t) Use Saily for Japan?

    Saily Is Perfect For:

    • Short-term tourists (1-4 weeks) who need reliable, affordable data
    • Business travelers who need to hit the ground running with connectivity
    • Digital nomads passing through Japan as part of a larger Asia trip
    • Budget-conscious travelers who want good coverage without overpaying
    • Anyone who hates dealing with physical SIM cards (I see you)

    Saily Might NOT Be Right For:

    • Long-term expats — you’ll want a proper Japanese phone plan with a local number
    • People who need a Japanese phone number — for bank accounts, apartment rentals, or local services
    • Ultra-heavy data users — if you regularly use 30+ GB/month, a pocket Wi-Fi rental or unlimited plan from another provider might be better
    • People with older phones — if your device doesn’t support eSIM, consider a physical Japan travel SIM card instead

    Frequently Asked Questions About Saily eSIM in Japan

    Can I use Saily eSIM to make phone calls in Japan?

    No, Saily provides data-only plans. However, this is rarely an issue in 2026. You can make calls through apps like LINE (which everyone in Japan uses), WhatsApp, FaceTime, or Skype using your data connection. For the rare occasion you need to call a Japanese landline, Skype credit is cheap and works perfectly over Saily’s data connection. Most restaurants, hotels, and services in Japan also accept online reservations, so you’ll rarely need to actually call anyone.

    Does Saily eSIM work on the Tokyo subway and Shinkansen?

    Yes, with some caveats. The Tokyo Metro and other subway systems have cellular coverage in stations and increasingly in tunnels, though you may experience brief dropouts between some stations on older lines. On the Shinkansen (bullet train), coverage is excellent along the Tokaido line (Tokyo-Osaka) and generally good on other routes. You might hit dead spots in long tunnels through mountainous areas, but this is the same for all carriers — it’s not a Saily-specific issue.

    Can I top up or buy more data if I run out during my Japan trip?

    Yes! This is one of Saily’s strengths. You can purchase additional data plans directly through the app at any time, and they activate almost instantly. You don’t need to install a new eSIM profile — the additional data simply gets added to your existing plan. Just make sure you still have some data left (or access to Wi-Fi) to complete the purchase. I’d recommend monitoring your usage in the app and topping up when you’re down to about 500 MB remaining.

    Is Saily eSIM secure for online banking and sensitive activities in Japan?

    Saily’s data connection is as secure as any standard cellular connection in Japan. Since it’s backed by Nord Security (the NordVPN people), they take privacy seriously and don’t log your browsing activity. That said, I’d still recommend using a VPN when connecting to public Wi-Fi at cafes, stations, or hotels. For online banking specifically, your bank’s app encryption handles security regardless of your connection type, but a VPN adds an extra layer of protection.

    Will Saily work in rural Japan, like Hokkaido or the Japanese countryside?

    In my testing, Saily performed well in moderately rural areas thanks to its connection to NTT Docomo’s network, which has the widest coverage footprint in Japan. I got usable speeds in Akita Prefecture and had no issues in smaller cities like Kanazawa and Takayama. However, in very remote mountainous areas or small islands, coverage can be spotty — but again, this is true for every carrier and eSIM provider in Japan. If you’re planning serious off-the-beaten-path adventures, download offline maps and translation packs before heading out.

    Conclusion: Should You Get Saily eSIM for Japan in 2026?

    After extensive testing across Japan, here’s my honest verdict: Saily is one of the best eSIM options for Japan travel in 2026, especially for budget-conscious travelers who want reliable coverage without overcomplicating things.

    The combination of competitive pricing, excellent app experience, strong NTT Docomo network coverage, and the backing of a reputable security company makes it a no-brainer recommendation for most travelers. The fact that you can install it before you leave home, activate it the moment you land, and top up instantly if you need more data — all without visiting a single shop or dealing with any Japanese paperwork — is exactly the kind of frictionless experience you want when you’re navigating a new country.

    Is it perfect? No. The lack of an unlimited plan is a minor drawback, and if you need a Japanese phone number for longer stays, you’ll need to look elsewhere. But for the vast majority of people visiting Japan — whether it’s a week-long cherry blossom trip, a month-long exploration, or a business visit — Saily delivers exactly what you need at a price that’s hard to beat.

    My advice? Download the app, grab a 5 GB or 10 GB plan, install it before your flight, and forget about connectivity stress. You’ve got temples to explore, ramen to eat, and trains to catch. Let Saily handle the boring stuff.

    And if you’re planning a longer stay in Japan, don’t forget to explore our guides on the best apps for learning Japanese and using Wise for money transfers in Japan to make your transition as smooth as possible.

    Safe travels, and see you in Japan! 🇯🇵

  • Japan Daily Update — 29 August 2026

    Japan News Digest — Saturday, 29 August 2026
    Your daily roundup of the stories shaping life in Japan, selected for expats and travellers.

    Japan Spends Record ¥15.39 Trillion on Forex Interventions

    The yen has been under pressure this summer, prompting the government to spend a record amount buying yen and selling dollars in July and August. If you’re planning to exchange money or send funds internationally, currency volatility like this can affect your rates and timing, so it’s worth monitoring the yen’s movement.

    Read full story

    Japan Acquires Former Nippon Steel Site for Defense Hub

    The government has secured a major site to develop an integrated defense facility, signalling continued investment in Japan’s security infrastructure. For expats in manufacturing or defence-adjacent sectors, this represents significant economic activity and potential employment opportunities in the coming years.

    Read full story

    Kumamoto Library Reopens After Earthquake Damage

    The municipal library in Uki, Kumamoto Prefecture is gradually returning to service following last month’s earthquake. If you’re based in or visiting Kumamoto, this is a positive sign of community recovery and a reminder of the region’s resilience.

    Read full story

    Japan’s Centrist Opposition Parties Struggle to Unite

    Merger talks between the Centrist Reform Alliance, Constitutional Democratic Party of Japan, and Komeito have stalled. While political realignments may seem distant from daily expat life, they can influence policy on employment, immigration, and local governance.

    Read full story

    Japan Supports ICC Despite Need for Scrutiny

    Japan continues backing the International Criminal Court and its Japanese president, though observers note the importance of maintaining independent oversight. This reflects Japan’s commitment to international institutions and rules-based governance.

    Read full story

    AI to Improve Japan’s Emergency Response System

    The Fire and Disaster Management Agency is rolling out AI to automatically transcribe emergency calls and guide operator decisions. For all residents and visitors, this upgrade means faster, more efficient emergency response when you need it most.

    Read full story

    Check back tomorrow for the latest Japan updates.


    Compiled daily from Japan Times and GaijinPot. Updated every morning.